The RV Homestead
A full-time RV dweller, living on Kelpie Kapers Farm, somewhere in the Cascade Foothills in Southwest Washington state.
Friday, August 2, 2024
Homestead Happenings August 2024
Monday, July 1, 2024
What We've Been Up To Lately On Kelpie Kapers Farm
Friday, May 3, 2024
Thursday, September 7, 2023
How To Save Tomato Seeds
I know that saving tomato seeds is a mystery to a lot of people. There are so many different ways to do this. What is the correct way?
I can't say that there's one correct way. I can only share how I was taught to save tomato seeds by Tomato Jim Wyant. It's the fermenting method. I successfully did this last year and grew tomatoes from those that I saved, so I can attest that it does work.
First, you want a specimen that is very ripe. Like if it's past ripe, that's even better! I saved 4 varieties this morning: Prairie Fire, Wolverine, Yamali Yellow and Bug Tussle Buttermilk Wonder. This is how I did it.
First, I determined which varieties that I wanted to save seeds from.
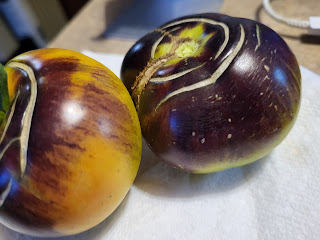
Below is a variety that I obtained from Tomato Jim Wyant called Bug Tussle Buttermilk Wonder. It's my first time to grow a white variety. I was not disappointed. This was one of the best tasting tomatoes that I've ever had. It's definitely a keeper and I'll grow more than one plant of it next year, for sure!
One of the other varieties that I saved seeds from is called Yamali Yellow. It's in the above photo. This particular variety is from my favorite tomato breeder, Tom Wagner. I like his stuff because he's a fellow Washingtonian, like me. I could not find this variety for sale from any seed vendor in the United States. A very kind friend, who lives outside of the United States, sent me the seeds. I'm forever in her debt for getting me the Yamali collection.
Next, I wrote what the variety is on a piece of paper towel.
Then, you simply cut the tomato in half and scoop the seeds out into a jar or a glass. I use Solo cups. I use the end of a metal measuring spoon to help me get all the seeds out.
The seeds and part of the pulp go into the Solo cup.
Then I top it with a couple of inches of water. If you are using city water, I'd recommend using bottled spring water. I am on a well and our water tests out fantastic, so I just use that.
Top the glass/cup with the paper towel. You can also use a coffee filter. They work really well, too. Secure with a rubber band. Put in a dark, not-to-warm spot for a few days and then start checking them. Once you see mold on the top of the water, you should be good to go.
The mold indicates that the gel that encases the tomato seed has fermented off and your seeds are ready to be rinsed and dried. I'll post another blog once I'm ready to do the final cleaning of the seeds, so stay tuned for that.
Once all is said and done, the birds get a nice tomato snack! They will love that!
Thursday, August 31, 2023
The RV Homestead (aka Kelpie Kapers Farm) Is Now On YouTube!
I've been tossing around the idea, for a long time now, of creating a YouTube channel to post videos. Bob bought me a cool vlogging camera last year but, due to health reasons, I just haven't really delved into it. Not too long ago, I took a video of the birds, in the run, and posted it.
This winter, as the weather gets worse, we plan on vlogging more cooking, but, to be completely honest, I will feature Bob cooking because I have too many health issues going on for me to be able to stand in the kitchen like I used to. I'm on oxygen now and, due to the state that my lungs are in, I couldn't have any surgeries to fix my back or hips because I wouldn't survive the surgery. It sucks getting old.
So, without further ado, I'd like to introduce our YouTube channel. If it says Jericha Jericho, you're on the right channel. Click
here.
In the meantime, enjoy a walk through of our tomato garden.
Thanks for your support,
Bob and Laurrie
Sunday, August 6, 2023
Fresh Blackberry Cobbler Baked On The Grill
Is there anything better than a freshly picked, ripe blackberry? Maybe...but not many things can rival the flavor. Blackberries have always been a particular favorite of mine. I'd even get out there and pick them if I weren't dragging around an oxygen tank and I wasn't terrified of snakes. We do have snakes here and where they hang I out, I don't. I don't even care if they aren't venomous and all that. I. Don't. Do. Snakes. At. All.
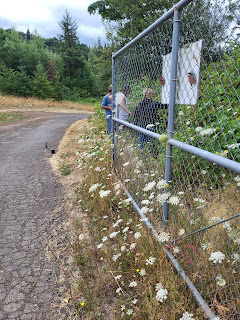
We had some friends come up who wanted to pick. They used to be neighbors of ours in the old RV park that we lived in. She had a place to pick but I guess they either told her that she couldn't access the property any longer or they sprayed the area. I don't really know. I just know that ours are spray-free and all organic and we have plenty.
Even Rose, our Australian kelpie dog, hung out with us. This was down in our lower field along the fence line by our second gate.
So, now onto my utterly delicious and easy cobbler recipe.
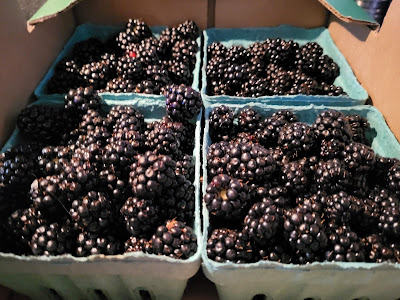
First, go pick a few pints of blackberries.
They grow all over the place around here. They can actually get quite invasive.
Spray an 8x8-inch baking pan with non-stick cooking spray. Add in 2 pints of fresh blackberries.
Mix up the cobbler batter. This comes together in a snap.
Pour the batter over the berries. Sprinkle a few tablespoons of sugar over the top and put it on a metal baking sheet and put it out on a gas grill, indirect heat, holding at around 350 degrees for about 20-25 minutes. If it starts to brown too much on one side, spin it around. When a toothpick inserted in the middle pulls out clean, the cobbler is done.
Laurrie's Fresh Blackberry Cobbler Baked On The Grill
1/2 cup unsalted butter, melted
1 cup all-purpose flour
1-1/2 teaspoons baking powder
1/4 teaspoon sea salt
1 cup milk
1 cup + 2 tablespoons sugar
2 teaspoons vanilla
2 pints fresh blackberries
Spray an 8x8-inch baking pan with non-stick cooking spray. Spread 2 pints of fresh blackberries in the bottom. Mix together flour, baking powder, salt and sugar. Mix in milk until most of the lumps are removed. Beat in the melted butter until batter is really smooth. Add vanilla and beat until combined.
Pour over the berries evenly. Put baking dish onto a metal sheet pan and put on a grill, upper rack preferably, over indirect heat. Start checking to see if it is done after 20-25 minutes using the toothpick test.
Serve alone or with either whipped cream or vanilla ice cream.
We plan on putting several gallons into the freezers for our birds this winter. They will enjoy the treats and we will, too. You are also able to use frozen berries to make this cobbler, as well. You can switch up the berries to include your favorites, like blueberries or even cherries.
Fresh blackberries are truly one of the treasures of summer! Enjoy!


