Thursday, September 30, 2021

Vanilla Bourbon Cheesecake

 I may be channeling my inner Golden Girl here, but is there anything more delicious and decadent than a homemade cheesecake?
It's getting to be that time of year when everything turns to pumpkin spice, apples and all those delicious fall favorites. To me, it means that it is time to create a new cheesecake.


I have another blog post about making homemade vanilla extract. Click here to view that post. I find that vanilla and bourbon are a marriage made in heaven. I don't buy vanilla flavored spirits, but I will certainly make my own! I used some of my homemade vanilla Jack Daniels in this creation. These flavors scream fall to me.


This recipe starts out with 32 ounces of room temperature cream cheese. Do not use a lower fat or fat-free type of cream cheese. Now is not the time. Use the full-fat variety. Make sure it's at room temperature. Make sure all of your ingredients are at room temperature.


The first thing you want to do is spray a 10-inch spring-form pan with nonstick cooking spray. Then, assemble your graham cracker crust. Make sure to use brown sugar in your crust. It makes a difference in how the taste of the crust melds with the taste of the cheesecake.


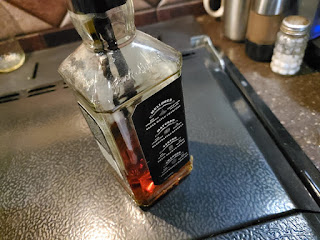
Here is a photo of my homemade vanilla Jack Daniels. This is such a delightful fall flavored ingredient.


Everything gets blended up. Again, to reiterate, make sure all of your ingredients are room temperature.


The cream cheese mixture gets poured into the crust and it bakes up in just over an hour into something extraordinarily decadent and delicious.


Vanilla Bourbon Cheesecake


For the crust:

1-1/2 cups graham cracker crumbs
2 tablespoons pure cane sugar
1 tablespoon dark brown sugar
7 tablespoons melted unsalted butter

For the filling:

32 ounces cream cheese, room temperature
1 cup pure cane sugar
2/3 cup sour cream, room temperature
4 large eggs, room temperature, lightly beaten
1 pinch of sea salt
3 tablespoons vanilla infused bourbon

Preheat oven to 325 degrees.
To make crust:
Mix all crust ingredients in a large bowl and press into bottom of a 10-inch spring-form pan. Set aside.

To make filling:
Blend cream cheese, with a mixer, until light and fluffy. Beat in sugar until it is dissolved. Add sour cream and mix to just combine. Add eggs, one at a time, mixing to just combine. Add salt and vanilla infused bourbon.

Pour into prepared crust. Put in preheated oven, on center rack, for 75-85 minutes, or until the center looks jiggly, much like jello. Turn off the oven and prop open the oven door with a wooden spoon and set a timer for 1 hour. After 1 hour, remove cheesecake from oven to a rack to cool for another hour. Chill in refrigerator at least 6 hours to overnight.
Refrigerate leftovers.

Saturday, September 18, 2021

Chicken & Dumplings

 I had Bob buy that rotisserie chicken yesterday. I made enchiladas with half of the meat. To view that  recipe, click here. Tonight's Chicken & Dumplings utilizes the other half of the meat and the carcass. This recipe took me all afternoon to complete and was worth every minute.


I boiled the carcass with all the vegetables that I had that were starting to dry out or look tired. I love that this is a great way to clear out the crisper drawers of stuff that I had just hanging around. I didn't bother to peel anything. I threw in bendy carrots, celery (that was way past its prime), half of a sweet potato. I let it cook down for about 3 hours. 


I strained it out and I was left with some fantastic looking broth. 


This is only the first part of this recipe. Congrats, you're advancing to level 2.

I wanted to do these two recipes to show how economical it can be to buy a rotisserie chicken, especially if you are feeding just 2 people. My sister always jokes with me because I'm not usually one who takes all this time to do things. I usually have several things going on at once. Anyhow, I was watching a YouTube video last night on how to make your food budget stretch and I got to thinking about just how much food is simply thrown away. It's appalling, if you think about it. So, I was determined to get every cent's worth from that rotisserie chicken. 


We just so happened to get our first storm of the year today. I don't think I'd really call it much of a storm, though. There was a bit of thunder and lightening and it did pour down rain a few times. I have to admire the grit of these two fishermen. They were dedicated there on the opposite bank of the river.

I salute them!


The next half of this recipe starts out by boiling the reserved chicken meat and whatever veg you like in the chicken stock that you just made.
There's no right or wrong way to do this because taste is subjective.
I used onion, garlic, celery, carrots and a parsnip. I thought I had another sweet potato, but it was purple and I didn't think that would look so nice. I wouldn't care but I knew I was going to take photos of this for this blog post and purple...not so much.


I let this come up to a boil with everything in it and cook until everything was soft enough to mush against the roof of your mouth with your tongue. 


This is sure comforting on a rainy day, I do have to say!


Chicken & Dumplings


1/2 of the meat from a rotisserie chicken from the supermarket
The carcass of the chicken
Any vegetables that you want to sacrifice to the stock pot
Enough water to cover
Salt and pepper, to taste

Boil all this together in a large pot and strain the solids out and throw those away. Put the rest back into a pot. Add the chopped meat, chopped vegetables, like celery, carrot, onion, garlic and parsnips. Add as many or as little vegetables as you like.
To that, add salt and pepper, to taste, 1-1/2 teaspoons Penzey's Bouquet Garni spice blend, 1 teaspoon dried parsley and some chopped fresh rosemary, optional. I grow it, so I always have it on hand.  Bring all to a rolling boil, lower heat to low and simmer until the vegetables are very soft. Add 3/4 cup of heavy cream to the soup.
Make dumpling dough.

Dumpling dough:

1 cup flour
1/2 cup heavy cream
1/2 teaspoon salt
2 teaspoons baking powder
1 teaspoon dried parsley

Mix all ingredients together until a dough forms. Drop by spoonfuls into liquid. Cover, cook about 20 minutes or until dough is cooked through.

*Please not that I am not compensated by Penzey's Spices. I just really like their products and use a ton of them.

Friday, September 17, 2021

Chicken-Green Chili Enchiladas

 Since Bob had all of his teeth pulled, it's been a struggle to find foods that he can eat because he has the added problem of having scar tissue in his throat, from the radiation treatments when he had throat cancer. He has to eat softer foods because he can't chew it up and certain things will hang up on that scar tissue and choke him. His medications do that to him all the time.
Anyhow, I digress.

We ordered some Mexican delivery for dinner the other night and Bob decided to give enchiladas a whirl. He ate them. He enjoyed them. I'll make enchiladas for him.


One thing that I think we're going to do more of, simply because it's cheaper for us to do so, is buying rotisserie chickens from the supermarket. There is a supermarket, here in town where the majority of the shoppers wear masks, that I will venture into. They sell their rotisserie chickens for like $6.50 or something. I cannot buy a whole chicken for that price very often. This week is one of those weeks, but I haven't placed my grocery order yet. I sent Bob for a chicken and some corn tortillas. 


Now, this rotisserie chicken is going to make 4 meals for us, 2 meals of enchiladas and 2 meals of what I'm going to make a blog post about tomorrow...5 if you count the chicken stock that I'll cook down, but I'm using that for meals 3 and 4, so I'm not counting it. We'll have enchiladas again on Sunday.
I pulled the meat off half of the chicken and cut it all super small for Bob. Next, it's as easy as opening a can of enchilada sauce, a can of green chilis and opening up a package of shredded Mexican blend cheese. 

Now before anyone goes off about these not being "from scratch", let me just say that I realize that. I'm working with a food budget and I try to stretch my dollars so that I can get a bit more of food put up so that we can enjoy the summer flavors this winter. My thinking is that the more economical I can make our dinners, the more of my budget I can spend on fruits and veggies to can up. I am tossing all of my previously canned up goods. Our shed had gotten rats in it and with those boxes of jars stacked on each other, I don't feel safe consuming any of it.


But I did feel entirely safe consuming these! Bob bought the street taco sized tortillas. At first, I thought that they would be WAY too small, but they were perfect sized. I made us each 3 enchiladas. I have enough filling, cheese and tortillas for another batch on Sunday and all we need to purchase is a 15-ounce can of enchilada sauce.


So, this may not be all from scratch, but it is delicious and it's economical and, all together, it will make 4 servings of 3 enchiladas each. 


Chicken-Green Chili Enchiladas
Makes 4 servings

1/2 of rotisserie chicken, chopped
2 tablespoons minced sweet onion
1 4-oz. can mild green chilis, drained
1 15-oz. can red enchilada sauce, use 1/4 cup on a deep plate to dip tortillas in, use 1/3 cup in the chicken mixture and use the rest add a thin layer of sauce to the bottom of the baking dish and to pour over the top of the enchiladas
1/2 cup sour cream
2 cups shredded Mexican blend cheese (or cheddar)
2 green onions, chopped
12 street taco size corn tortillas

Preheat oven to 350 degrees.
Shred chicken, put in a bowl and mix with onion, chilis, sour cream and 1/3 cup enchilada sauce.
Pour 1/4 cup enchilada sauce into a deep plate or pie dish. Dip each tortilla into the sauce, coating both sides, sprinkle a small pinch of cheese down the center of the tortilla, add a few spoonfuls of the chicken-green chili filling, top with another pinch of cheese, roll up and put in a baking dish that has a thin layer of enchilada sauce in the bottom. Place seam-side down.  Repeat for all the tortillas.
Pour remaining enchilada sauce over the enchiladas in the baking dish. Top with remaining cheese and green onions.
Bake 30 minutes, uncovered.
Remove from oven, let stand for 5 minutes before serving.

*You can assemble these and freeze. Use within 3 months. The leftover filling will last for 3 days in the refrigerator.
*I wore disposable gloves while I assembled this dish.

Saturday, September 11, 2021

Homemade Vanilla Extract

 Vanilla is a necessity in any baked good. Any rich chocolate dessert that is delicious beyond belief has vanilla in it. Describing vanilla is like attempting to describe a color. It's strongly aromatic and it's warm, floral flavor gently and distinctly compliments many other spices and foods.

Most vanilla is grown in Madagascar, the world's fourth largest island, which, in the past 20 years, has experienced 35 cyclones, 8 floods and 5 periods of severe drought. 

Vanilla is an orchid. There are hundreds of types of orchids, but only one, the vanilla planifolia, produces vanilla beans. They are finicky and very hard to keep alive. I keep thinking back to all those times, in my younger years, that I bought an orchid and brought it home and tried to keep it alive. I failed every single time. I couldn't even imagine trying to grow one outdoors!

Vanilla orchids have a short flowering season and each one has to be hand pollinated by someone who knows what they are doing. Hand pollination is a difficult process. Once harvested, the job is not over, either. From growth to export, the entire process takes about a year.

For a while, consumers were content with synthetic vanilla flavoring, which can be bought for super cheap. Today, it's trending that we only use the real stuff, so that drove up the cost of vanilla beans. They are roughly $300 per pound. This is the most labor-intensive spice to grow and it is the second most expensive spice in the world. It costs us, the American consumer, roughly $20 for 4 ounces of real extract.

So, when I was able to find some Tahitian grade B vanilla beans, 10 for less than $15, I was all over that deal! I decided to make my own extract. I started into this with a pint of Jack Daniels and a couple of vanilla beans that I wound up buying from Penzey's Spices (on a side note, here in a few weeks, stay tuned for a great opportunity, that is not sponsored, that the RV Park Homestead will be hosting. A clue is Penzey's Spices!). I was hooked. That was THE BEST extract ever! There is something about chocolate and that sour mash that is just magical to the taste buds! I wound up using that bottle up and buying another bottle and putting all the old beans into it along with 10 more! Then, a few years ago, I bought a fifth of locally made craft vodka. I wasn't sure what I was going to do with it because neither of us drinks anymore, so it sat in the cabinet until I decided that I would turn it into vanilla extract. I stuck 10 vanilla beans in there and forgot about it for about 8 months. The result is a golden bottle of vanilla loveliness! So, I bought 20 more vanilla beans and some different types of booze and I'm making vanilla!


I believe in using alcohol that you would drink. I think it's the same concept as cooking with wine. If it's gross from the get-go, it's not going to be a top quality product at the end. The taste of that craft vodka puts it in the same league as Grey Goose, as far as I'm concerned. It's a shame that they went out of business.
I just started the rum and the Wild Turkey today as my 20 vanilla beans just came in. Rum extract is tasty. I like to use it in tropical flavored desserts like pineapple upside down cake or a from-scratch coconut cream pie. Vanilla rum extract is simply going to put rum extract into a league of its own. Same with all the others. Suffice it to say that I have a tidy little sum invested into my extracts and we'll enjoy them for many years to come.


The Exalt vodka used to be a clear liquor, just as the rum is right now. I've had the beans soaking in the vodka for over 8 months now. The Jack Daniels has been soaking even longer than that!


Can you tell which has been my favorite so far? 


In a few months, this rum will be the same color as the vodka is...and just as flavorful.

If you want to learn more about how vanilla is grown, here's an excellent video. Click here.

So, thank you for having this vanilla chat with me. I've really enjoyed it. I'll leave you all with some furry kid photos.


Peace!

Tuesday, September 7, 2021

Giardiniera

 I love giardiniera mix. I've been wanting to make some for a long time now, so I figured that it was as good of a day as any to do it since I had taken advantage of a local farmers market for some awesome produce.


At first, I thought I was going to make that chunky mix that I like to buy occasionally from the supermarket. I read up about it and found out that there were two different types. There is the original Italian version, which I do love, and there is a Chicago-Style, which is more of a condiment.
If you know me, you know I love condiments. I usually have no less than 15 in my fridge at one time. I have an entire shelf dedicated to my condiments and, all I can say is that it's a good thing that we have a spare fridge in our outdoor kitchen! This is supposed to be spectacular on a hot dog. In a month or so, I'm going to get some really good hot dogs and I'm going to try it.


I found a recipe for a small batch. I didn't want half of a leftover head of cauliflower, because I'd be the only one eating it and, while I do like cauliflower, I don't like cauliflower enough to eat half a head of it by myself. I chopped up the whole thing. It was tedious, but I think it will be worth it in the end.
The beauty of this recipe is that it will utilize most all of your garden produce harvest! Celery, onions, carrots, eggplant, cauliflower, red peppers, hot peppers...it's all in there! Since I decided to use the whole head of cauliflower, I used 1/2 cup of kosher salt and just over 5 cups of water to brine. You want the veggies to be covered by salt water. I left to soak, refrigerated, overnight.


While my jars were getting sterilized in boiling water, I drained and rinsed the veggies off. I split them in half into my two bigger sized pots and I used vinegar, sugar and spice in each pot and boiled for about 15-20 minutes. 


I made exactly 3 quarts. Ideally, this can be canned up in pints, but I'm saving those for other things that need to be consumed quickly after opening. This stuff can last in the jar for months, so this was just the way that was logical for me. 


I processed these quarts for 20 minutes to be on the safe side. I don't think I'll use that particular pot to can quarts in anymore. It's great for pints and half pints but not for quarts. That's why I processed for 20 minutes...better safe than sorry.


Viola! Enough giardiniera to use for the whole year!


Giardiniera
*makes 3 quarts or 6 pints

Ingredients

Day 1-cut all vegetables into small-dice sized pieces, enough to make 3 quarts. There are no measurements because these ingredients are all to an individual's preference.

  • Cauliflower
  • Red bell pepper
  • Sweet onion
  • Celery
  • Carrot
  • Hot peppers (optional)
  • Eggplant

Other veggies can be used, too: zucchini, green olives, banana peppers, etc. 


Day 2-cook vegetables in brine. I split between 2 pans and split the brine in half, as well.

  • 8 c white vinegar
  • 2 Tbsp sugar
  • 2 bay leaves
  • 1/2 tsp black peppercorns
  • 1 tsp each celery seed and fennel seed


  • On the first day, chop all vegetables and place in a large bowl. Sprinkle salt over veggies and stir to combine, then add water until veggies are submerged. Let set for 12 hours or overnight.

    On day two, rinse the veggies well under cold running water. Combine all the Day 2 ingredients in a large pot with the veggies and bring to a boil. Lower heat and simmer for 20 minutes. Place into sterilized, hot jars. Seal. (Please look at the safe canning guidelines. Click here for link.) Process 15 minutes for quarts, 10 minutes for pints. Let cool thoroughly.