Showing posts with label original recipe. Show all posts

Sunday, August 6, 2023

Fresh Blackberry Cobbler Baked On The Grill

 Is there anything better than a freshly picked, ripe blackberry? Maybe...but not many things can rival the flavor. Blackberries have always been a particular favorite of mine. I'd even get out there and pick them if I weren't dragging around an oxygen tank and I wasn't terrified of snakes. We do have snakes here and where they hang I out, I don't. I don't even care if they aren't venomous and all that. I. Don't. Do. Snakes. At. All.


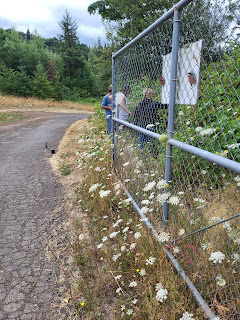
We had some friends come up who wanted to pick. They used to be neighbors of ours in the old RV park that we lived in. She had a place to pick but I guess they either told her that she couldn't access the property any longer or they sprayed the area. I don't really know. I just know that ours are spray-free and all organic and we have plenty.


Even Rose, our Australian kelpie dog, hung out with us. This was down in our lower field along the fence line by our second gate.


So, now onto my utterly delicious and easy cobbler recipe.


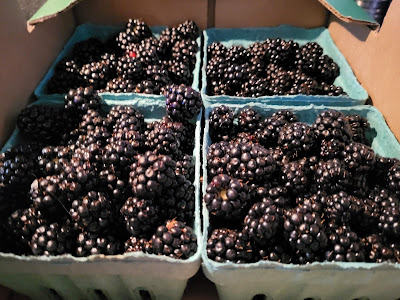
First, go pick a few pints of blackberries.


They grow all over the place around here. They can actually get quite invasive.


Spray an 8x8-inch baking pan with non-stick cooking spray. Add in 2 pints of fresh blackberries.


Mix up the cobbler batter. This comes together in a snap.


Pour the batter over the berries. Sprinkle a few tablespoons of sugar over the top and put it on a metal baking sheet and put it out on a gas grill, indirect heat, holding at around 350 degrees for about 20-25 minutes. If it starts to brown too much on one side, spin it around. When a toothpick inserted in the middle pulls out clean, the cobbler is done.


Laurrie's Fresh Blackberry Cobbler Baked On The Grill

1/2 cup unsalted butter, melted
1 cup all-purpose flour
1-1/2 teaspoons baking powder
1/4 teaspoon sea salt
1 cup milk
1 cup + 2 tablespoons sugar
2 teaspoons vanilla
2 pints fresh blackberries

Spray an 8x8-inch baking pan with non-stick cooking spray. Spread 2 pints of fresh blackberries in the bottom. Mix together flour, baking powder, salt and sugar. Mix in milk until most of the lumps are removed. Beat in the melted butter until batter is really smooth. Add vanilla and beat until combined.
Pour over the berries evenly. Put baking dish onto a metal sheet pan and put on a grill, upper rack preferably, over indirect heat. Start checking to see if it is done after 20-25 minutes using the toothpick test.
Serve alone or with either whipped cream or vanilla ice cream.


We plan on putting several gallons into the freezers for our birds this winter. They will enjoy the treats and we will, too. You are also able to use frozen berries to make this cobbler, as well. You can switch up the berries to include your favorites, like blueberries or even cherries.


Fresh blackberries are truly one of the treasures of summer! Enjoy!
Saturday, October 22, 2022

Autumn Garden Relish

 I believe our incredible warm weather streak has finally ended as of yesterday. It's not a moment too soon that we got that canopy up over the fifth wheel, either. I find it satisfying to walk outside and not get wet when it's raining out. Bob was so kind as to go out and gleen all the tomatoes off of the plants and pick all the beans. We're going to see if we can get our remaining zucchini to get a bit bigger before picking it. I will plant garlic this coming week and, after that freak hot weather streak through October wiped out all of my fall seedlings, I'm opting to not do much of a fall garden. I'll tackle it again next season.

I have a ton of unripe tomatoes. I've put up 5 pints of  Picalilli. I'm going to be canning up sliced green unripe tomatoes this afternoon so that we can enjoy fried green tomatoes this winter. Yesterday, I put up 6 pints of Autumn Garden Relish. I used this recipe from Healthy Canning as inspiration. Click here to view it.

Without further ado, let's dive right into this recipe.


This recipe starts out with a lot of finely chopped vegetables. I used cabbage (leftover from when I made Picalilli), cauliflower, unripe green tomatoes, onion, green pepper, red pepper and celery. This gets tossed in a bit of pickling salt and I left it to sit overnight in the fridge.

The next day, I drained this veg mixture. I prepped 6 wide-mouth canning jars by washing them in hot, soapy water and then I boiled them for 10 minutes. I left them to sit in the hot water until I was ready for them. In the meantime, I prepped the brine for this relish.


I started out by adding in the spices I would be using: mustard powder, turmeric and celery seed.


Then I added in sugar and white vinegar. This gets mixed up and brought up to a boil before you add the veg.


Once you add the veg, bring the mixture to a full rolling boil. Reduce heat and simmer for 30 minutes, stirring occasionally.


Everything will get a golden hue from the turmeric.


My stove only has 3 burners, so I wind up shuffling pots around so that everything has a place. I've finally got a system down that works for me.


These get processed in a water bath canner for 15 minutes.


Once these jars come out of the canner, I set them in a towel covered baking sheet (so that they can be moved easily) and I cover them in a couple of layers of towels. I want them to cool down slowly, over a 12-hour period. I don't want them to cool too quickly because that can actually weaken the jars.


After the jars are thoroughly cooled down and all the lids have sealed, I write what they are on the lid, date them, put them back into the box and we are storing these under our bed because it lifts up, it's very cool under there, it's dark and it seems like as good as place as any to put them. It's my canning pantry, so to speak.

Autumn Garden Relish

Yield: 6 pints

4 cups chopped cabbage
3 cups finely chopped cauliflower
2 cups chopped unripe green tomatoes
2 cups diced onions
1 cup diced green bell pepper
1 cup diced red bell pepper
1 cup diced celery
3 tablespoons pickling/canning salt
3-3/4 cup white vinegar
3 teaspoons celery seed
1-3/4 teaspoons turmeric
3 teaspoons mustard powder
2-3/4 cups white cane sugar

Mix all veg together with pickling salt. Put in fridge overnight.

While you are prepping the brine, let the veg drain thoroughly in a colander.
Mix all spices with sugar in a large pot. Add vinegar. Bring to a boil, lower heat to low and simmer for 10 minutes. Add drained veg. Bring back to a full boil, lower heat and simmer, uncovered, for 30 minutes, stirring occasionally.
Put into prepped jars, leaving 1/2-inch headspace. Process in boiling water bath canner for 15 minutes. Turn off heat, let jars sit in hot water for 5 minutes then remove to cool completely for 12-24 hours.

Enjoy!

Saturday, August 27, 2022

Pickled Garlic Scapes

 We have had a lot go on this past week or so. First, we bought a 1979 Honda Odyssey. I have dubbed it The Beast. This thing is so much fun! It really scoots up and down the driveway! We're still in the market for a good used 4-wheel ATV, but this is just a fun toy. Did we need it? No. But you can't put a price tag on having fun.


Now, onto a different topic. Our tomatillos, that we grew out from seed, are producing. Bob said that he picked up most of these from the ground but he did pull a few off of the plants. I'm working on a quart bag. Once I get enough to make a batch of salsa verde, I'll get it canned up and put up.


There weren't a ton of them, but it's a start, for sure.


I need two pounds for a batch of salsa verde.


This is what I had slated to do today. I bought these last week and I wanted to get them pickled up. I read several recipes online and just came up with my own. This recipe makes one full pint. One very full pint. Okay. I crammed them all in there. Don't judge me.


I washed the scapes and cut them into lengths that would fit into my jar.


At first, I wasn't sure if I would have enough to fill up my jar.


As you can see, that didn't become an issue at all.


I added the mustard seeds and peppercorns into the jar.


Then, I made up the pickling brine.


And, after all was said and done, I have one very full pint of pickled garlic scapes.


Pickled Garlic Scapes

*Yield 1 pint

1/4 pound garlic scapes, washed and trimmed and cut into pieces that fit into your jar
1/2 cup apple cider vinegar
1/2 cup water
1/2 tablespoon kosher salt
1/2 tablespoon sugar
1/4 teaspoon mustard seeds
1/4 teaspoon black peppercorns

Wash scapes and trim them. Cut them into pieces that will fit into your jar. Add peppercorns and mustard seeds to the jar after it is filled with the cut garlic scapes.
Put the rest of the ingredients into a small saucepan and bring to a boil. Pour over the scapes in the jar. Let set until brine is room temperature. Cover tightly and store in the refrigerator for at least 2 weeks before you use them.

Enjoy!

Wednesday, August 10, 2022

Harvest Chicken & Rice

 Today was relatively cool at. We barely broke 70 degrees out. I had harvested quite a few of my Walla Walla Sweet onions a few days ago and we had a pretty decent picking of green beans. I also harvested my garlic so that I could get ready for the new seed garlic that I have coming in.

I came up with a new recipe for dinner tonight.


Bob had taken out a package of bone-in, skin-on chicken thighs to thaw a few days ago and I needed to get them used up. We also picked a pretty decent sized mess of beans.


These are a mixture of my Tongues of Fire, Dragon Tongue, Tanya's Pink Pod, Cherokee Wax, Blue Lake and Contender beans.


The Harvest Chicken & Rice recipe starts out with a chopped sweet onion. You could use a Vidalia if you don't have Walla Walla Sweets available. I also chopped up one of my small heads of garlic. It doesn't get much more fresh than this.


I melted butter with olive oil. This is what I used to saute the onions and garlic.


Once the onion gets translucent, add in the rice and orzo mixture.


Saute this until the orzo starts to smell toasty and gets lightly golden brown. I cooked this in an enameled cast iron Dutch oven, so I did this low and slow.


I removed the skin from 4 chicken thighs. Then I sprinkled them, both sides, with a blend of spices.


Those get set upon the rice mixture once it has been browned.


Then I poured in chicken broth and water. I put the cover on the Dutch oven and let it cook in a moderate oven for 45 minutes.


This is a simple and delicious recipe. It hit all the right spots for us.


I served this with simple boiled beans. I cooked these in part chicken broth and part water. I didn't get a photo of the end result because we all know what boiled beans look like.

Harvest Chicken & Rice

4 bone-in, skin-on chicken thighs
1 small chopped sweet onion (like a Walla Walla Sweet or Vidalia)
2 cloves garlic, chopped
2 tablespoons unsalted butter
1 tablespoon olive oil (or avocado)
1-1/2 cups long grain white rice
1/3 cup orzo
1-3/4 cups chicken broth
1 cup water

Spice Rub for Chicken:

1 teaspoon smoked paprika
1 teaspoon dried thyme
1/2 teaspoon garlic powder
1/2 teaspoon onion powder
Sea salt and black pepper, to taste

Preheat oven to 350 degrees.

Pull skin off of chicken thighs and rub with spice rub on both sides. Set aside.

Saute onion and garlic in butter and olive oil over medium heat until onion is soft and translucent. Add in rice and orzo. Stir to coat with oil/butter. Cook until the orzo begins to smell nutty and gets lightly golden brown.
Place seasoned chicken thighs on top of the rice, add broth and water. Remove from heat. Cover tightly. Place in preheated oven and cook for 45 minutes or until chicken reaches an internal temperature of 165 degrees on a meat thermometer.

Fluff rice and serve.

Enjoy!


Wednesday, April 20, 2022

Spring Frittata

 We decided to have a veggan meal today. Not vegan. It's veggan. Veggans eat eggs. It's spring. I have some fresh veggies in my fridge. I felt like making a quick meal and that would be a Spring Frittata. This is fantastic served with toast or with a green salad. We made a couple of pieces of toast from that loaf of bread I baked off yesterday.

This recipe starts out with a bit of milk and a cast iron skillet. It doesn't matter what type of milk. You can use whole milk (like I did), you can use 2%, you can use skim, you can use half and half...you can even use oat milk, if that's what you like! It doesn't matter. Just use what you have or what you want.


Next, you crack 6 eggs into the milk. I added in some herbs and freshly cracked black pepper before I mixed it all up.


I used a Penzey's Spice blend called Parisien Bonnes Herbes.This blend contains chives, dill, basil, tarragon, chervil and white pepper. It's absolutely delicious and it's right up there in my top 3 favorites from Penzey's.


Next up, I opted for some nice spring type flavored veggies. I used some spring onions, frozen peas and asparagus.


Just measure out your veggies so that they total one cup. 


These get cooked in a tablespoon of olive oil for about 7 or 8 minutes. You don't have to cook them that long. You could just sprinkle them over the eggs, but for Bob, they have to be cooked. I'm okay with that. 


Preheat your oven to 350 degrees. Add your beaten eggs in. Sprinkle the top with 1/3 cup of cheese (again, whatever cheese you like will work). I used pepper jack. This goes in to the oven for 20 minutes and it comes out like...


This was our veggan dinner tonight. 


So, this dinner was completely from scratch and that includes the strawberry jam, as well.


Spring Frittata


6 eggs
1/4 cup milk
1/3 cup grated cheese
1 tablespoon olive oil
1 cup total chopped spring onions, asparagus and frozen peas
1/4 teaspoon sea salt
1/8 teaspoon black pepper
1 teaspoon Penzey's Parisiene Bonnes Herbes herb mix

Preheat oven to 350 degrees.
Whisk eggs with milk, pepper and herb mix.
In cast iron skillet, saute vegetables in olive oil for 5-8 minutes, sprinkle with 1/4 teaspoon salt. Add egg mixture, shake to distribute evenly.
Put in preheated oven. Bake 20 minutes.