Showing posts with label homemade. Show all posts

Sunday, August 6, 2023

Fresh Blackberry Cobbler Baked On The Grill

 Is there anything better than a freshly picked, ripe blackberry? Maybe...but not many things can rival the flavor. Blackberries have always been a particular favorite of mine. I'd even get out there and pick them if I weren't dragging around an oxygen tank and I wasn't terrified of snakes. We do have snakes here and where they hang I out, I don't. I don't even care if they aren't venomous and all that. I. Don't. Do. Snakes. At. All.


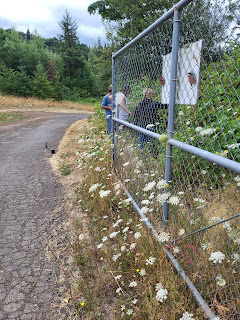
We had some friends come up who wanted to pick. They used to be neighbors of ours in the old RV park that we lived in. She had a place to pick but I guess they either told her that she couldn't access the property any longer or they sprayed the area. I don't really know. I just know that ours are spray-free and all organic and we have plenty.


Even Rose, our Australian kelpie dog, hung out with us. This was down in our lower field along the fence line by our second gate.


So, now onto my utterly delicious and easy cobbler recipe.


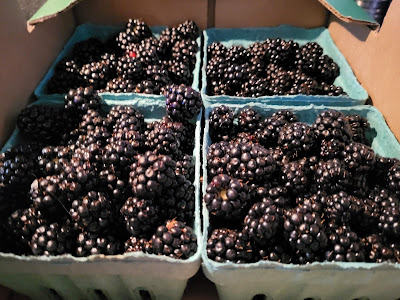
First, go pick a few pints of blackberries.


They grow all over the place around here. They can actually get quite invasive.


Spray an 8x8-inch baking pan with non-stick cooking spray. Add in 2 pints of fresh blackberries.


Mix up the cobbler batter. This comes together in a snap.


Pour the batter over the berries. Sprinkle a few tablespoons of sugar over the top and put it on a metal baking sheet and put it out on a gas grill, indirect heat, holding at around 350 degrees for about 20-25 minutes. If it starts to brown too much on one side, spin it around. When a toothpick inserted in the middle pulls out clean, the cobbler is done.


Laurrie's Fresh Blackberry Cobbler Baked On The Grill

1/2 cup unsalted butter, melted
1 cup all-purpose flour
1-1/2 teaspoons baking powder
1/4 teaspoon sea salt
1 cup milk
1 cup + 2 tablespoons sugar
2 teaspoons vanilla
2 pints fresh blackberries

Spray an 8x8-inch baking pan with non-stick cooking spray. Spread 2 pints of fresh blackberries in the bottom. Mix together flour, baking powder, salt and sugar. Mix in milk until most of the lumps are removed. Beat in the melted butter until batter is really smooth. Add vanilla and beat until combined.
Pour over the berries evenly. Put baking dish onto a metal sheet pan and put on a grill, upper rack preferably, over indirect heat. Start checking to see if it is done after 20-25 minutes using the toothpick test.
Serve alone or with either whipped cream or vanilla ice cream.


We plan on putting several gallons into the freezers for our birds this winter. They will enjoy the treats and we will, too. You are also able to use frozen berries to make this cobbler, as well. You can switch up the berries to include your favorites, like blueberries or even cherries.


Fresh blackberries are truly one of the treasures of summer! Enjoy!
Sunday, May 21, 2023

Chive Blossom Vinegar

 If you grow your own chives, you'll know that they produce a pretty lavender colored flower. From those flowers, we get seeds. I've been growing the same pot of chives, that I started from seed, for close to 10 years now.
What can you do with chives other than snip them onto a baked potato? Well, there's a lot you can do with them. I like to dehydrate them and powder them up and use them in seasoning blends. I also love to pick the flowers and make vinegar with them. They make an amazing base to vinaigrette dressings.

First, I'll show you all yesterday morning's livestock sighting down in the rock pit.


They like to graze down there. We like to watch them grazing down there. We see deer here almost every day. There were 4 does, but I couldn't over to get the other 2 in a photo.


I asked Bob if he would go out and pick the flowers off of the chives so that I could make vinegar. He agreed.


I did have to tell him to not pull the chives out by the roots.


He used his pocketknife. That was completely fine with me.


He came in with a fairly decent amount. They will continue to flower, so I'm not worried about not leaving enough blooms to reseed. There will be plenty for that and to make more vinegar.

I divided the blooms between 2 half-pint jars. I also snipped in some fresh chives.


I topped off the jars with white wine vinegar.


After that, just put the lids on, put in a dark, cool place for 3 or 4 days and then strain the vinegar. I plan on putting it back into the white vinegar bottle.

Now, I am waiting for my garlic scapes to come on. I hope it's soon!
Enjoy!

Tuesday, November 22, 2022

The Start of Thanksgiving Cooking 2022

 I'll admit that I use broth in a box throughout the year. It's not that I can't make my own stock. I absolutely can. It's just that usually I have no room in my fridge or freezer to horde chicken or turkey carcasses.
That changed. Our old little chest freezer gave up the ghost on us. We didn't realize it, and we lost a full freezer full of food. We bought a new chest freezer, however. I stocked up on several turkeys and turkey breasts. We don't eat turkey nearly enough throughout the year. I made us a turkey dinner, using one of the frozen turkey breasts that I had squirreled away, just because, not long after we moved up here to Kelpie Kapers Farm. I found whole turkeys for 98 cents per pound at Walmart. I bought 3 of them. Likewise, I found turkey breasts at Safeway for $12 or less. I bought 2. I purposefully kept room in that chest freezer to store my bones so that I can start making my own stock. My goal is to become less dependent on the supermarket supply chain and slowly work over to using my own home produced items. I will start with growing amaranth and quinoa next year.
I'm getting ahead of myself. I tend to get a bit excited when I talk about my self-sufficiency goals.

Back to making stock. The key component to any successful and delicious Thanksgiving feast is a good homemade turkey stock. Safeway had turkey necks for sale. I bought a pack of 3 of them. They were a bit on the spendy side, at over $3, for a piece of turkey that nobody really ever thinks of...but I sure do! Not only do turkey necks make a delicious stock to use for dressing and/or gravy, the meat off of the necks is some of the most delectable meat on the whole bird! It's just a major pain in the keister to pick it off the bones. That's why I only do it when I want to make a dinner that I want to impress Bob with.

I decided a few weeks ago to start collecting vegetable scraps to make my turkey stock with. They hung out in the freezer for a bit.


I bought my vegetables for Thanksgiving with the idea of most of them being multipurpose. I'm adding chopped fennel to my dressing this year. I bought a fennel bulb with a lot of fronds and stalks on it so that I could use it in my stock. Not only that, but I saved my asparagus ends for the stock. A word to the wise and because my sister, Ginger, gave me a heads-up about putting asparagus ends into stock. Too many of them will cause your stock to have a bitter taste to it. Use them sparingly. I'll still save them because I like to use them to make cream of asparagus soup. That's a different blog post for another time, though. 


I added in a shallot that I simply cut in half. I didn't bother peeling it. There's no need. The solids are all strained out and discarded (except for the turkey necks). I added in 3 or 4 bay leaves, celery, carrots, a whole head of garlic that I cut in half. I left the skin on the head of garlic. It's like the shallot. There's no need to peel it. I also added in a couple of parsnips that had seen better days that I had in the crisper drawer.  I also added in some Penzey's Bavarian Herb blend. It has all the good stuff in it. Some kosher salt and freshly ground black pepper finished it all off.


I love that we have well water up here and we don't have to use city water. I added in 2 quarts of cold water and a good glug of a nice oaky chardonnay.
I put this over high heat just until it came to a boil and then I turned the heat down to low and let it simmer. It reduced by over a third. I added another half quart of water to it and let it condense down again.
When all was said and done, it took around 2-1/2 hours to get a quart of some rich looking turkey stock to use in my stuffing and gravy recipes on Thursday.


Cheers!

Thursday, September 15, 2022

Blackberries

 We are running roughly a month late here in western Washington state, but blackberry season is now upon us. Bob has been picking them for me and I've been experimenting with recipes. It's cool to have so many blackberries around here that I can experiment a bit.

Blackberries are an invasive species here. They are everywhere. Lots of people kill them off. I have seen them engulf entire houses if left unchecked. We don't mind them as long as they don't encroach on our space. We can coexist.

I made 2 different blackberry recipes this afternoon. The first one is Blackberry Spice Cake. This is my new favorite cake recipe, hands down. Not only is it just too easy to whip up, you don't need a boatload of blackberries. You only need around a cup or so. You can just eyeball the amount. You don't have to be exact.


This is a simple and delicious cake recipe. I don't feel it needs frosting at all. If you feel the need to put something on it, sprinkle it with powdered sugar. I don't feel it's necessary, however. It can stand alone.


I creamed soft butter with sugar. Then I added in a couple of eggs.


The spice mixture is cinnamon, allspice, cloves and nutmeg.


I picked out a cup of some of the best looking berries and added those in.
Then, while this was baking, I put together an Apple-Blackberry Pie.
The apples came from our orchard.


So, you'll get a bonus blackberry recipe in this post!


This cake is so delicious! I'm hoping I can make it with frozen berries and not have a purple cake. We shall see later on.


And the pie turned out great. It wasn't cooled down by the time I started writing this post, so we'll wait until tomorrow to cut into it.

Blackberry Spice Cake
*Makes one 9x9-inch cake (9 generous servings)

1 cup fresh blackberries
2 cups flour
1/2 cup soft butter
1 cup sugar
2 eggs
1 teaspoon baking soda
1 teaspoon cinnamon
3/4 teaspoon nutmeg
1/2 teaspoon allspice
1/2 teaspoon cloves
1/2 teaspoon salt
3/4 cup buttermilk

Preheat oven to 350 degrees. Spray a 9x9-inch baking pan with nonstick cooking spray. Mix dry ingredients together in a small bowl. Set aside.
Cream butter and sugar together. Add eggs. Add half of the dry ingredients alternately with the buttermilk
Fold blackberries into batter very gently so that you don't break them up. Spread evenly into baking dish.
Bake 45-50 minutes or until a toothpick inserted in the middle pulls out clean.
Cool completely before cutting.


Apple Blackberry Pie
*8 servings

Pastry for a double 9-inch crust
5 cups peeled, cored and sliced tart apples
1 pint fresh blackberries
1 tablespoon lemon juice
1 cup sugar
1/4 cup cornstarch
2 tablespoons butter
1 egg
1 teaspoon water

Preheat oven to 375 degrees.
Line pie pan with bottom crust.
Mix sugar with cornstarch in a small bowl and set aside. Peel, core and slice apples and toss with lemon juice. Add sugar mixture to apples and toss to combine. Gently toss in blackberries. Add to pie shell. Top with other crust and crimp edges.
Mix egg with a bit of water. Brush over the entire top crust. Cut several vents into top crust to release steam. Bake for 50-60 minutes or until filling is bubbly and the top crust is golden brown.
Cool thoroughly before cutting.

Enjoy!

Friday, August 12, 2022

Making Peach Jam #EveryBitCountsChallenge

 It's that time of year that I start preserving different things for wintertime use. This is the first thing I've canned this year. I tend to follow the insert that comes in the box of Sure Jell pectin when it comes to canning. Those recipes are tried, true and they never fail. They are tested for safety. They take the guesswork out of it.

I will tweak things slightly, like seasonings, herbs, etc., but I leave the main components alone.

I digress.

I'm getting in on the Every Bit Counts Challenge. I'm a bit late to the party, but better late than never. This challenge is that every day in August, you make something to put up for the winter. It doesn't matter if it is canned, dehydrated, freeze-dried, frozen or you are simply making seed starter pots out of toilet paper rolls. It all counts. The past few days, I was working my way through 20 pounds of fresh peaches. The majority went into the freezer except the one that I ate and the ones I used to make this batch of jam.

So, without further ado, here's how I make Peach Jam.


I love looking at these golden jars of peach perfection!


This recipe starts out with 4 cups of chopped/smashed peaches. Make sure to measure carefully. 

 
In a separate bowl, measure out 5-1/2 cups of granulated sugar. When I'm canning, I make sure that I buy pure cane sugar. I don't want to use sugar that is made from beets. I'm going to attempt to grow out sugar beets next year and make my own sugar, so stay tuned for that...but for this recipe, it's pure cane sugar all the way!


I had Bob get out my big pot. Unless I'm canning quart jars, I like to use this pot to can in. It's just easier to handle for me.


I mixed the chopped peaches with 2 tablespoons of lemon juice and a box of Sure Jell pectin. This is a case where I deviate from the recipe. I don't use fresh lemons. I use bottled lemon juice. Every single time that I've ever bought fresh lemons to use, something has come up and they turn on me. I find that if I just buy bottles of lime and lemon juice, they can last in the fridge almost indefinitely. I may go through a bottle of each per year.


This gets combined in a large pan. I used my enameled cast iron Dutch oven. It is the perfect size to make a batch of jam in.


You cook the peaches, pectin and lemon juice with a scant 1/2 teaspoon of butter until it comes to a full, rolling boil. What that means is when you stir it hard, you can't stir the bubbles down.


After the mixture comes to a full, rolling boil, you add in all the sugar at once. Just dump it in. The sugar actually becomes a liquid. That's why you measure out the sugar before you start and put it in a bowl. That way, it's just ready to go.


You bring that mixture back up to a full, rolling boil and boil it for exactly one minute. I have a clock that has a second hand on it so I can be uber precise with the timing.


Before I got started cooking, I got out what I would need. I put some white vinegar into a dish. I got a couple of paper towels. I use the paper towels dipped into the vinegar to clean the rims of the jars.


I filled the jars leaving 1/4 inch of headspace. You can eyeball it. You don't have to measure. They do sell a gadget that will measure for you, if you're more comfortable doing it that way.


This is the homemade rack that Bob made for me. He used floral wire to connect the lids together. It works perfectly.
If you don't have this stuff, you can put a kitchen towel in the bottom. You just need something to keep the bottoms of the jars off of the bottom of the pan.


I put my lids into a pan of simmering water. Some people don't do this. I do this.
I don't see how it will hurt anything, to be honest.


I put the lids and rings on each jar and screwed them on until they are just finger-tight. You don't want to crank them down super tight. Just barely finger-tight is enough. I put these into the pot so that they weren't touching.

I put the lid on, turned the heat on and brought it up to a boil. Once it came to a full boil, I set a timer for 10 minutes. Once that was done, I turned off the flame and set another timer for 5 minutes. That's when I removed the jars to set on a towel lined baking tray. I put my jars on baking trays because it's easier for us to move them around that way. I covered them with another towel and within 30 minutes, I heard that sound that is music to a canner's ears...the ping of a lid sealing...6 times, one for each jar of peach jam.

I don't really use peach jam on toast or sandwiches. I use peach jam as a base for other things, like BBQ sauce, Asian sauces, etc. I'll make an odd piece of toast here and there, but I made this for other things.


Here you have these peachy jars of perfection!

If you want to view the full recipe, look at the insert that comes in a box of Sure Jell pectin.

#EveryBitCountsChallenge

Wednesday, August 10, 2022

Harvest Chicken & Rice

 Today was relatively cool at. We barely broke 70 degrees out. I had harvested quite a few of my Walla Walla Sweet onions a few days ago and we had a pretty decent picking of green beans. I also harvested my garlic so that I could get ready for the new seed garlic that I have coming in.

I came up with a new recipe for dinner tonight.


Bob had taken out a package of bone-in, skin-on chicken thighs to thaw a few days ago and I needed to get them used up. We also picked a pretty decent sized mess of beans.


These are a mixture of my Tongues of Fire, Dragon Tongue, Tanya's Pink Pod, Cherokee Wax, Blue Lake and Contender beans.


The Harvest Chicken & Rice recipe starts out with a chopped sweet onion. You could use a Vidalia if you don't have Walla Walla Sweets available. I also chopped up one of my small heads of garlic. It doesn't get much more fresh than this.


I melted butter with olive oil. This is what I used to saute the onions and garlic.


Once the onion gets translucent, add in the rice and orzo mixture.


Saute this until the orzo starts to smell toasty and gets lightly golden brown. I cooked this in an enameled cast iron Dutch oven, so I did this low and slow.


I removed the skin from 4 chicken thighs. Then I sprinkled them, both sides, with a blend of spices.


Those get set upon the rice mixture once it has been browned.


Then I poured in chicken broth and water. I put the cover on the Dutch oven and let it cook in a moderate oven for 45 minutes.


This is a simple and delicious recipe. It hit all the right spots for us.


I served this with simple boiled beans. I cooked these in part chicken broth and part water. I didn't get a photo of the end result because we all know what boiled beans look like.

Harvest Chicken & Rice

4 bone-in, skin-on chicken thighs
1 small chopped sweet onion (like a Walla Walla Sweet or Vidalia)
2 cloves garlic, chopped
2 tablespoons unsalted butter
1 tablespoon olive oil (or avocado)
1-1/2 cups long grain white rice
1/3 cup orzo
1-3/4 cups chicken broth
1 cup water

Spice Rub for Chicken:

1 teaspoon smoked paprika
1 teaspoon dried thyme
1/2 teaspoon garlic powder
1/2 teaspoon onion powder
Sea salt and black pepper, to taste

Preheat oven to 350 degrees.

Pull skin off of chicken thighs and rub with spice rub on both sides. Set aside.

Saute onion and garlic in butter and olive oil over medium heat until onion is soft and translucent. Add in rice and orzo. Stir to coat with oil/butter. Cook until the orzo begins to smell nutty and gets lightly golden brown.
Place seasoned chicken thighs on top of the rice, add broth and water. Remove from heat. Cover tightly. Place in preheated oven and cook for 45 minutes or until chicken reaches an internal temperature of 165 degrees on a meat thermometer.

Fluff rice and serve.

Enjoy!