Showing posts with label asian inspired. Show all posts

Monday, April 4, 2022

Asian Orange Chicken

 I've been craving Asian food something fierce lately. I can't just order Door Dash any longer living where we do. So, I put in a grocery order and I dug out my Asian ingredients and went to work. It was time to make my weekly grocery order anyhow.


I can't say as I was very pleased with the orange that Fred Meyer picked out for me. It was half green. It's a good thing that I only needed a teaspoon of zest or they would have heard from me.


I bought some rock sugar at an Asian market last week when we went to Vancouver. I've been anxious to try it out.


I also minced up a whole lot of garlic.


I bought a 2 pound pack of chicken tenders. I used half tonight and baked off the other half to use for tomorrow night. I'll be making Arroz Chaufa (Peruvian Fried Rice). 


Asian food requires scallions. I don't care what type it is. I don't care which country's cuisine it is. Green onions are required.


The sauce. It has soy sauce in it. There's also orange juice, orange zest, apple cider vinegar, rice wine vinegar and some hot sauce.


The chicken gets cut up into bite-sized pieces and coated in some cornstarch.


I fried the chicken up in batches.


After it was all browned and cooked through, I added all the chicken back into the pan, scooted it to the sides and added in the garlic and rock sugar. 


After the rock sugar melted down, I added the sauce. It thickens pretty fast. 


Add in the scallions and toss them in the sauce.


YUM! You'll never need to order Orange Chicken again! Serve over hot rice.


Asian Orange Chicken

1 pound boneless, skinless chicken breast, cut into bite-sized pieces
1/2 cup cornstarch
2 tablespoons avocado oil
4 green onions, thinly sliced

For the sauce:
1/2 cup orange juice
1 teaspoon orange zest
3 cloves garlic, minced
1/2-1 teaspoon (or more) Sriracha sauce
1/3 cup chicken broth
1 ounce rock sugar (or just use 2 tablespoons of granulated sugar)
2 tablespoons soy sauce
2 teaspoons apple cider vinegar
1 tablespoon rice wine vinegar
2-1/2 teaspoons cornstarch

Mix all the sauce ingredients except for the garlic and rock sugar. If using granulated sugar, mix it into the sauce, as well. Set aside.
Put 1/2 cup cornstarch into a plastic bag and shake the chicken pieces in it. Remove and shake off excess cornstarch.
Heat oil in a wok or skillet over high heat. Brown the chicken in the avocado oil, in batches, until lightly browned.
Once all the chicken is browned, add all the chicken back into the pan and scoot to the sides. Add the garlic and rock sugar to the pan and cook for about 30 seconds or so, until you can smell the garlic and the rock sugar melts down. Add the sauce in and stir until very thick. Toss to coat the chicken thoroughly. Add in green onions and toss once more. Serve immediately over hot rice.

Wednesday, March 9, 2022

Hawaiian Shoyu Chicken

 Bob has an upcoming medical procedure that I won't go into on a cooking blog. Anyhow, tonight is the last night he can eat a regular diet. After this, for a few days, he goes on a low fiber diet and then a straight liquid diet. Anyhow, he shoveled a yard and a half of soil for me today and filled several raised beds. He deserves a tasty dinner on his last night of normal food for a while.


I ordered the shoyu sauce from Amazon. Here is what I ordered. It's not the cheapest stuff on the planet, but I don't think you could really make Shoyu Chicken without it.


This recipe is made using skin-on, bone-in chicken pieces. You'll want roughly 2 pounds. What pieces you use is entirely up to you. I chose thighs. I'd make this recipe using wings, too.
You want to brown them in a tablespoon of oil. I use canola as it is a heart healthy neutral flavored oil. Again, in your kitchen, use what you want. I probably wouldn't use olive oil, though. Thoroughly brown the chicken on both sides.


While the chicken is browning, mix up the sauce (see recipe below) and prep the ginger and the garlic. 


Definitely make sure the chicken is browned. It will make a difference later on. Be patient. Don't rush it.


After the chicken is uniformly golden color, add the sauce, ginger and garlic. Bring to a boil, lower the heat to low, cover and simmer for 10 minutes. Turn each piece over, cover, simmer another 10 minutes. 


After 20 minutes, the chicken will be a dark brown color. This is when you remove the lid and turn up the heat a bit and start cooking down the sauce. 


As the sauce reduces, it coats the chicken pieces and turns them mahogany. Keep boiling until you have a sauce that is the consistency of syrup.


This is just damn delicious, no matter how you want to look at it.


I served this with some coconut rice and some Hawaiian Mac Salad.

Aloha!


Hawaiian Shoyu Chicken

2 pounds chicken pieces
1 tablespoon canola oil
1/2 cup shoyu soy sauce
1/2 cup water
1/2 cup sugar
2 tablespoon rice vinegar
4 cloves garlic, smashed
2 inch piece of ginger, peeled and thinly sliced

Brown chicken in a skillet, over medium heat, in a tablespoon of oil. In the meantime, in a medium bowl, whisk together shoyu sauce, water and sugar. Set aside.
When chicken is golden brown, add the sauce mixture along with the garlic and ginger. Bring to a boil, cover, reduce heat and simmer for 10 minutes. Turn chicken over and repeat.
When chicken has simmered for 20 minutes, remove lid and turn heat to medium-high and reduce sauce until it is the consistency of syrup, continually basting and turning the chicken pieces to coat.
Serve with rice.

Sunday, July 18, 2021

Thai-Inspired Red Coconut Curry Shrimp over Coconut Rice

 My husband gets started on some extensive dental work on Tuesday. He will be having all of his top teeth pulled. Granted, he's already lost most of them, but the rest will be going. When he had radiation treatment for throat cancer, over a decade ago, his teeth were trashed. He needs to get dentures. So, for several months, after getting his bottom teeth pulled out, which will be a few weeks after he gets the top ones done, he will not have any teeth at all to chew with. He needs to get dentures because he can't eat many foods. He has scar tissue in his throat and there is a dead muscle in there. It doesn't work. Anyhow, if food isn't chewed up really well, it hangs up on that spot and it chokes him and, sometimes, I've had to really whack him on the back to get it up. It's scary to go through and eating certain things for dinner gives me anxiety because I do not like to see that happen. Let's not even go there with Bob actually going through it. Yes, it's happened a few times at restaurants, too. He's learned to not order his favorite, which is steak. He knows that he can't eat anything like Chinese sweet and sour pork or chicken. He has trouble with spinach and greens. Tortillas and a gas station corn dog have made him choke. The poor guy!

Anyhow, that's the back story on how this recipe came about.
We both love Asian food. I think we could dine on Asian flavors for weeks on end and never tire of it. While Bob tends to favor Korean, I lean bit more toward Thai cuisine. We both like coconut curry, if it's not too spicy. So, I came up with a complete main dish that only uses 1 can of coconut milk, 1/2 a pound of shrimp, uses up a few summer squash, doesn't result in a gallon of leftovers and it's not spicy because, if it is, Bob can't eat it.
This is a huge win in my book. I do not have room in my fridge for leftovers and I'm not a huge fan of zucchini, or summer squash. I like winter squash just fine, but zucchini...yeah...not so much. I find summer squash to be just tolerable. Now, if you take that summer squash and put in a red coconut curry squash, that's going to pique my interest.


Here's how I did it. First, wash and chop all your ingredients. Make sure everything is prepped. Once you start, you do not have time to put everything on hold to chop up the next thing. Chop the veggies. Peel the shrimp. Thank me later. You're welcome. 


Veggies prepped beforehand.


Start the rice after you prep the veggies and shrimp. You'll have 20 minutes to cook the curry. If you don't have a rice cooker (I am not endorsing this brand. It's just a cheapie that I picked up on Amazon for under $20 and it does the trick because the burners, on my RV stove, burn too hot to cook rice on them), just use a saucepan with a tight-fitting lid. Either way, rice cooker or pan, it's going to take 20 minutes.

Saute the veggies in a hot skillet in a tablespoon of avocado oil until zucchini start to get a bit of color and the onion is softer, but not mush. 

Now's the time that you'll want to have already prepped those shrimp. I do pull the shells completely off. I don't leave the tail sections on. I actually don't really like it when the tail section of the shell is left on. It's annoying to me. 
You've already used 1/2 of a can of coconut milk in the rice, so this is when you use the other half of the can. First, you add red curry paste, fish sauce and some brown sugar. This would also be where you could add in a spice element, if you want, like however many Thai birds-eye chili peppers it takes for you to light yourself on fire, if you're into that! I skip them because of Bob. If it was just for me, I'd add 2 or 3 in. You could also just use crushed red pepper flakes or you could use a jalapeno pepper. There's many options out there. Pick the one that's right for you.
Did that sound like a commercial or what?


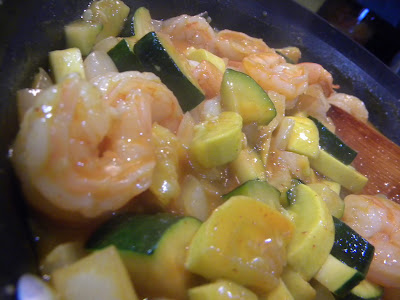
Once all the curry paste, coconut milk, and what have you meld together into a  homogeneous pool of yum, toss in the shrimp and keep stirring them around until they curl up and turn pink. This is very important. Do not overcook the shrimp. Overcooked shrimp is absolutely nasty and not even worth eating. Once they turn opaque, take the pan off the heat.
By this time, your rice should be done.
Also, by this time, your entire RV will be filled with a very lovely coconut scent...with the faintest hint of fish sauce.
Make sure to run an exhaust fan.
Whatever you do, DO NOT sniff the contents of a bottle of fish sauce.
I promise that it tastes nothing like it smells.


This was delicious. There were no leftovers at all because (mic drop) I actually created a recipe for TWO PEOPLE!
Thai-Inspired Red Coconut Curry Shrimp over Coconut Basmati Rice (yes, I know that they usually eat Jasmine rice, but I have basmati...deal with it). Delicious!


Serves 2


Coconut Basmati Rice

7 ounces (half a can) of coconut milk
1/2 cup + 2 tablespoons water
1/2 teaspoon brown sugar
1/4 teaspoon sea salt
3/4 cup basmati rice

If you're cooking in a rice cooker, add all the ingredients and cook for 20 minutes. If you're cooking in a saucepan, bring all ingredients, except the rice, up to a boil. Add rice, stir. Lower heat to as low as your stove will go. Pop a tight-fitting lid onto the pan. Cook for 20 minutes. Turn off the heat. Let stand for 5-10 minutes before opening lid to fluff the rice.


Thai-Inspired Red Coconut Curry Shrimp

1/2 pound large shrimp, peeled and cleaned.
1 tablespoon avocado oil
1/2 can coconut milk
1/2 of a medium-sized Walla Walla sweet onion, chopped (use 1/4 of the onion if it's a big one, like I had)
1 small zucchini, chopped
1 small yellow summer squash, chopped
1-2 tablespoons red curry paste
1/2 tablespoon fish sauce
1 tablespoon brown sugar
and
Make a cornstarch slurry using 1 tablespoon cornstarch mixed with 1 tablespoon water. You may or may not need this.

Prep all vegetables and shrimp in advance.
Heat skillet or wok over high heat. Add onions and cook, stirring constantly, for about 2 minutes before adding in all the squash (zukes and yellow squash) all at once. Continue to cook and stir for about 4-5 more minutes or until squash starts to get a bit golden in color and onion is soft but not mushy.
Add in red curry paste, cook for about 30 seconds, add fish sauce, brown sugar and coconut milk. Stir to combine curry paste into coconut milk. Once it's thoroughly blended in, add shrimp and cook, stirring, for another 3-4 minutes. If your sauce is too loose, bind it by slowly drizzling in the cornstarch slurry until it's the right consistency. I like mine a bit on the thinner side so that it will permeate the rice. If you want a thicker sauce, use the entire amount and it should tighten up enough to sit on top of the rice. It's a matter of preference.