Showing posts with label from scratch. Show all posts

Friday, August 12, 2022

Making Peach Jam #EveryBitCountsChallenge

 It's that time of year that I start preserving different things for wintertime use. This is the first thing I've canned this year. I tend to follow the insert that comes in the box of Sure Jell pectin when it comes to canning. Those recipes are tried, true and they never fail. They are tested for safety. They take the guesswork out of it.

I will tweak things slightly, like seasonings, herbs, etc., but I leave the main components alone.

I digress.

I'm getting in on the Every Bit Counts Challenge. I'm a bit late to the party, but better late than never. This challenge is that every day in August, you make something to put up for the winter. It doesn't matter if it is canned, dehydrated, freeze-dried, frozen or you are simply making seed starter pots out of toilet paper rolls. It all counts. The past few days, I was working my way through 20 pounds of fresh peaches. The majority went into the freezer except the one that I ate and the ones I used to make this batch of jam.

So, without further ado, here's how I make Peach Jam.


I love looking at these golden jars of peach perfection!


This recipe starts out with 4 cups of chopped/smashed peaches. Make sure to measure carefully. 

 
In a separate bowl, measure out 5-1/2 cups of granulated sugar. When I'm canning, I make sure that I buy pure cane sugar. I don't want to use sugar that is made from beets. I'm going to attempt to grow out sugar beets next year and make my own sugar, so stay tuned for that...but for this recipe, it's pure cane sugar all the way!


I had Bob get out my big pot. Unless I'm canning quart jars, I like to use this pot to can in. It's just easier to handle for me.


I mixed the chopped peaches with 2 tablespoons of lemon juice and a box of Sure Jell pectin. This is a case where I deviate from the recipe. I don't use fresh lemons. I use bottled lemon juice. Every single time that I've ever bought fresh lemons to use, something has come up and they turn on me. I find that if I just buy bottles of lime and lemon juice, they can last in the fridge almost indefinitely. I may go through a bottle of each per year.


This gets combined in a large pan. I used my enameled cast iron Dutch oven. It is the perfect size to make a batch of jam in.


You cook the peaches, pectin and lemon juice with a scant 1/2 teaspoon of butter until it comes to a full, rolling boil. What that means is when you stir it hard, you can't stir the bubbles down.


After the mixture comes to a full, rolling boil, you add in all the sugar at once. Just dump it in. The sugar actually becomes a liquid. That's why you measure out the sugar before you start and put it in a bowl. That way, it's just ready to go.


You bring that mixture back up to a full, rolling boil and boil it for exactly one minute. I have a clock that has a second hand on it so I can be uber precise with the timing.


Before I got started cooking, I got out what I would need. I put some white vinegar into a dish. I got a couple of paper towels. I use the paper towels dipped into the vinegar to clean the rims of the jars.


I filled the jars leaving 1/4 inch of headspace. You can eyeball it. You don't have to measure. They do sell a gadget that will measure for you, if you're more comfortable doing it that way.


This is the homemade rack that Bob made for me. He used floral wire to connect the lids together. It works perfectly.
If you don't have this stuff, you can put a kitchen towel in the bottom. You just need something to keep the bottoms of the jars off of the bottom of the pan.


I put my lids into a pan of simmering water. Some people don't do this. I do this.
I don't see how it will hurt anything, to be honest.


I put the lids and rings on each jar and screwed them on until they are just finger-tight. You don't want to crank them down super tight. Just barely finger-tight is enough. I put these into the pot so that they weren't touching.

I put the lid on, turned the heat on and brought it up to a boil. Once it came to a full boil, I set a timer for 10 minutes. Once that was done, I turned off the flame and set another timer for 5 minutes. That's when I removed the jars to set on a towel lined baking tray. I put my jars on baking trays because it's easier for us to move them around that way. I covered them with another towel and within 30 minutes, I heard that sound that is music to a canner's ears...the ping of a lid sealing...6 times, one for each jar of peach jam.

I don't really use peach jam on toast or sandwiches. I use peach jam as a base for other things, like BBQ sauce, Asian sauces, etc. I'll make an odd piece of toast here and there, but I made this for other things.


Here you have these peachy jars of perfection!

If you want to view the full recipe, look at the insert that comes in a box of Sure Jell pectin.

#EveryBitCountsChallenge

Wednesday, August 10, 2022

Harvest Chicken & Rice

 Today was relatively cool at. We barely broke 70 degrees out. I had harvested quite a few of my Walla Walla Sweet onions a few days ago and we had a pretty decent picking of green beans. I also harvested my garlic so that I could get ready for the new seed garlic that I have coming in.

I came up with a new recipe for dinner tonight.


Bob had taken out a package of bone-in, skin-on chicken thighs to thaw a few days ago and I needed to get them used up. We also picked a pretty decent sized mess of beans.


These are a mixture of my Tongues of Fire, Dragon Tongue, Tanya's Pink Pod, Cherokee Wax, Blue Lake and Contender beans.


The Harvest Chicken & Rice recipe starts out with a chopped sweet onion. You could use a Vidalia if you don't have Walla Walla Sweets available. I also chopped up one of my small heads of garlic. It doesn't get much more fresh than this.


I melted butter with olive oil. This is what I used to saute the onions and garlic.


Once the onion gets translucent, add in the rice and orzo mixture.


Saute this until the orzo starts to smell toasty and gets lightly golden brown. I cooked this in an enameled cast iron Dutch oven, so I did this low and slow.


I removed the skin from 4 chicken thighs. Then I sprinkled them, both sides, with a blend of spices.


Those get set upon the rice mixture once it has been browned.


Then I poured in chicken broth and water. I put the cover on the Dutch oven and let it cook in a moderate oven for 45 minutes.


This is a simple and delicious recipe. It hit all the right spots for us.


I served this with simple boiled beans. I cooked these in part chicken broth and part water. I didn't get a photo of the end result because we all know what boiled beans look like.

Harvest Chicken & Rice

4 bone-in, skin-on chicken thighs
1 small chopped sweet onion (like a Walla Walla Sweet or Vidalia)
2 cloves garlic, chopped
2 tablespoons unsalted butter
1 tablespoon olive oil (or avocado)
1-1/2 cups long grain white rice
1/3 cup orzo
1-3/4 cups chicken broth
1 cup water

Spice Rub for Chicken:

1 teaspoon smoked paprika
1 teaspoon dried thyme
1/2 teaspoon garlic powder
1/2 teaspoon onion powder
Sea salt and black pepper, to taste

Preheat oven to 350 degrees.

Pull skin off of chicken thighs and rub with spice rub on both sides. Set aside.

Saute onion and garlic in butter and olive oil over medium heat until onion is soft and translucent. Add in rice and orzo. Stir to coat with oil/butter. Cook until the orzo begins to smell nutty and gets lightly golden brown.
Place seasoned chicken thighs on top of the rice, add broth and water. Remove from heat. Cover tightly. Place in preheated oven and cook for 45 minutes or until chicken reaches an internal temperature of 165 degrees on a meat thermometer.

Fluff rice and serve.

Enjoy!


Tuesday, April 5, 2022

Arroz Chaufa (Peruvian Fried Rice)

 I prepared an Asian chicken recipe last night and cooked extra chicken to make dinner tonight. I've created a week's menu and I'm determined to stick to it. I'm trying to cut down on grocery costs and I'm also trying to make less work for myself. I'm getting older. I'm getting lazier. I am not even ashamed to admit it.
Anyhow, I read several recipes for a Peruvian version of fried rice. This is right up my alley. I can make a pretty mean fried rice, if I do say so myself.

This is what I came up with and it also uses up some of the random things rattling around in the produce crisper drawer.


As usual, with any recipe that has an Asian inspiration, make sure to prep all of the ingredients and have them ready to go. I cooked the rice this morning and chilled it down in the fridge. Rice cookers, I now feel, are a necessity. The funny thing is that I refused to use one until we bought this fifth wheel. Now, I can't imagine not having one. I just add everything in, set a timer and forget about it.


When I chopped the green onions, I separated the white parts from the green parts. This recipe starts out frying a bit of bell pepper (color doesn't matter, just use what you have) and onion. 


As long as carrots are not boiled into a mush, I don't mind them. I added in a small grated one so that I could get more veggies into Bob.He did get his new dentures, but, after going through those radiation treatments, he's left with an overactive gag reflex. So, they are making him gag. He's going to make an appointment and go in and have them fixed. 


After everything (yes, this fried rice has hot dogs in it) gets added in, hit it with a tablespoon or two of soy sauce. Don't judge for the hot dogs. Once in a while, I just crave one.


Top with a sunny-side up egg. Make sure it is crispy on the bottom. 


See? Perfectly crispy. Perfectly cooked. Perfectly delicious. The perfect thing after getting stung by a yellow jacket today...hence, the hot dogs comfort food addition. It's fried rice. It is a dish that you can put anything in and it will taste delicious.


Arroz Chaufa

2 tablespoons avocado oil
4 green onions, sliced, separate the white parts from the green tops
1/2 bell pepper, diced (use whatever color you like, it doesn't matter)
2 hot dogs, sliced
1 cup cooked chicken, cubed or shredded (whatever you like to do)
2 beaten eggs
3 cloves garlic, minced
1-inch piece fresh ginger, peeled and grated
1 small carrot, peeled and grated
3 cups cold cooked rice
2-3 tablespoons soy sauce (or to taste)
1 teaspoon sesame oil
2 sunny-side up fried eggs with crispy edges

Prep all the ingredients and have them ready to go.
In a large wok, or skillet, over high heat, stir fry the white part of the onions with the bell pepper for 2 minutes. Add the carrot. Continue to stir fry for another 1 minute. Add the garlic and ginger. Stir fry for 30 seconds. Add the chicken and hot dogs. Cook for another minute or so. Add the rice. cook until everything has a slight coating of oil and is hot completely through. Add soy sauce. Toss to coat. Drizzle with sesame oil and garnish with the green part of the green onions. Set aside until you've cooked the sunny-side up eggs. Place a sunny-side up egg on top of each serving. There will be leftovers if you're making this for 2 people. Just reheat the leftovers in the microwave and top with a freshly cooked egg.

Enjoy!


Monday, April 4, 2022

Asian Orange Chicken

 I've been craving Asian food something fierce lately. I can't just order Door Dash any longer living where we do. So, I put in a grocery order and I dug out my Asian ingredients and went to work. It was time to make my weekly grocery order anyhow.


I can't say as I was very pleased with the orange that Fred Meyer picked out for me. It was half green. It's a good thing that I only needed a teaspoon of zest or they would have heard from me.


I bought some rock sugar at an Asian market last week when we went to Vancouver. I've been anxious to try it out.


I also minced up a whole lot of garlic.


I bought a 2 pound pack of chicken tenders. I used half tonight and baked off the other half to use for tomorrow night. I'll be making Arroz Chaufa (Peruvian Fried Rice). 


Asian food requires scallions. I don't care what type it is. I don't care which country's cuisine it is. Green onions are required.


The sauce. It has soy sauce in it. There's also orange juice, orange zest, apple cider vinegar, rice wine vinegar and some hot sauce.


The chicken gets cut up into bite-sized pieces and coated in some cornstarch.


I fried the chicken up in batches.


After it was all browned and cooked through, I added all the chicken back into the pan, scooted it to the sides and added in the garlic and rock sugar. 


After the rock sugar melted down, I added the sauce. It thickens pretty fast. 


Add in the scallions and toss them in the sauce.


YUM! You'll never need to order Orange Chicken again! Serve over hot rice.


Asian Orange Chicken

1 pound boneless, skinless chicken breast, cut into bite-sized pieces
1/2 cup cornstarch
2 tablespoons avocado oil
4 green onions, thinly sliced

For the sauce:
1/2 cup orange juice
1 teaspoon orange zest
3 cloves garlic, minced
1/2-1 teaspoon (or more) Sriracha sauce
1/3 cup chicken broth
1 ounce rock sugar (or just use 2 tablespoons of granulated sugar)
2 tablespoons soy sauce
2 teaspoons apple cider vinegar
1 tablespoon rice wine vinegar
2-1/2 teaspoons cornstarch

Mix all the sauce ingredients except for the garlic and rock sugar. If using granulated sugar, mix it into the sauce, as well. Set aside.
Put 1/2 cup cornstarch into a plastic bag and shake the chicken pieces in it. Remove and shake off excess cornstarch.
Heat oil in a wok or skillet over high heat. Brown the chicken in the avocado oil, in batches, until lightly browned.
Once all the chicken is browned, add all the chicken back into the pan and scoot to the sides. Add the garlic and rock sugar to the pan and cook for about 30 seconds or so, until you can smell the garlic and the rock sugar melts down. Add the sauce in and stir until very thick. Toss to coat the chicken thoroughly. Add in green onions and toss once more. Serve immediately over hot rice.

Thursday, September 30, 2021

Vanilla Bourbon Cheesecake

 I may be channeling my inner Golden Girl here, but is there anything more delicious and decadent than a homemade cheesecake?
It's getting to be that time of year when everything turns to pumpkin spice, apples and all those delicious fall favorites. To me, it means that it is time to create a new cheesecake.


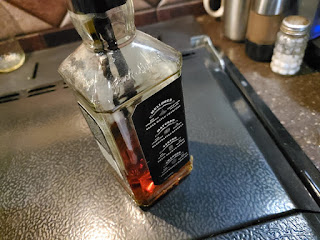
I have another blog post about making homemade vanilla extract. Click here to view that post. I find that vanilla and bourbon are a marriage made in heaven. I don't buy vanilla flavored spirits, but I will certainly make my own! I used some of my homemade vanilla Jack Daniels in this creation. These flavors scream fall to me.


This recipe starts out with 32 ounces of room temperature cream cheese. Do not use a lower fat or fat-free type of cream cheese. Now is not the time. Use the full-fat variety. Make sure it's at room temperature. Make sure all of your ingredients are at room temperature.


The first thing you want to do is spray a 10-inch spring-form pan with nonstick cooking spray. Then, assemble your graham cracker crust. Make sure to use brown sugar in your crust. It makes a difference in how the taste of the crust melds with the taste of the cheesecake.


Here is a photo of my homemade vanilla Jack Daniels. This is such a delightful fall flavored ingredient.


Everything gets blended up. Again, to reiterate, make sure all of your ingredients are room temperature.


The cream cheese mixture gets poured into the crust and it bakes up in just over an hour into something extraordinarily decadent and delicious.


Vanilla Bourbon Cheesecake


For the crust:

1-1/2 cups graham cracker crumbs
2 tablespoons pure cane sugar
1 tablespoon dark brown sugar
7 tablespoons melted unsalted butter

For the filling:

32 ounces cream cheese, room temperature
1 cup pure cane sugar
2/3 cup sour cream, room temperature
4 large eggs, room temperature, lightly beaten
1 pinch of sea salt
3 tablespoons vanilla infused bourbon

Preheat oven to 325 degrees.
To make crust:
Mix all crust ingredients in a large bowl and press into bottom of a 10-inch spring-form pan. Set aside.

To make filling:
Blend cream cheese, with a mixer, until light and fluffy. Beat in sugar until it is dissolved. Add sour cream and mix to just combine. Add eggs, one at a time, mixing to just combine. Add salt and vanilla infused bourbon.

Pour into prepared crust. Put in preheated oven, on center rack, for 75-85 minutes, or until the center looks jiggly, much like jello. Turn off the oven and prop open the oven door with a wooden spoon and set a timer for 1 hour. After 1 hour, remove cheesecake from oven to a rack to cool for another hour. Chill in refrigerator at least 6 hours to overnight.
Refrigerate leftovers.