Tuesday, September 7, 2021

Giardiniera

 I love giardiniera mix. I've been wanting to make some for a long time now, so I figured that it was as good of a day as any to do it since I had taken advantage of a local farmers market for some awesome produce.


At first, I thought I was going to make that chunky mix that I like to buy occasionally from the supermarket. I read up about it and found out that there were two different types. There is the original Italian version, which I do love, and there is a Chicago-Style, which is more of a condiment.
If you know me, you know I love condiments. I usually have no less than 15 in my fridge at one time. I have an entire shelf dedicated to my condiments and, all I can say is that it's a good thing that we have a spare fridge in our outdoor kitchen! This is supposed to be spectacular on a hot dog. In a month or so, I'm going to get some really good hot dogs and I'm going to try it.


I found a recipe for a small batch. I didn't want half of a leftover head of cauliflower, because I'd be the only one eating it and, while I do like cauliflower, I don't like cauliflower enough to eat half a head of it by myself. I chopped up the whole thing. It was tedious, but I think it will be worth it in the end.
The beauty of this recipe is that it will utilize most all of your garden produce harvest! Celery, onions, carrots, eggplant, cauliflower, red peppers, hot peppers...it's all in there! Since I decided to use the whole head of cauliflower, I used 1/2 cup of kosher salt and just over 5 cups of water to brine. You want the veggies to be covered by salt water. I left to soak, refrigerated, overnight.


While my jars were getting sterilized in boiling water, I drained and rinsed the veggies off. I split them in half into my two bigger sized pots and I used vinegar, sugar and spice in each pot and boiled for about 15-20 minutes. 


I made exactly 3 quarts. Ideally, this can be canned up in pints, but I'm saving those for other things that need to be consumed quickly after opening. This stuff can last in the jar for months, so this was just the way that was logical for me. 


I processed these quarts for 20 minutes to be on the safe side. I don't think I'll use that particular pot to can quarts in anymore. It's great for pints and half pints but not for quarts. That's why I processed for 20 minutes...better safe than sorry.


Viola! Enough giardiniera to use for the whole year!


Giardiniera
*makes 3 quarts or 6 pints

Ingredients

Day 1-cut all vegetables into small-dice sized pieces, enough to make 3 quarts. There are no measurements because these ingredients are all to an individual's preference.

  • Cauliflower
  • Red bell pepper
  • Sweet onion
  • Celery
  • Carrot
  • Hot peppers (optional)
  • Eggplant

Other veggies can be used, too: zucchini, green olives, banana peppers, etc. 


Day 2-cook vegetables in brine. I split between 2 pans and split the brine in half, as well.

  • 8 c white vinegar
  • 2 Tbsp sugar
  • 2 bay leaves
  • 1/2 tsp black peppercorns
  • 1 tsp each celery seed and fennel seed


  • On the first day, chop all vegetables and place in a large bowl. Sprinkle salt over veggies and stir to combine, then add water until veggies are submerged. Let set for 12 hours or overnight.

    On day two, rinse the veggies well under cold running water. Combine all the Day 2 ingredients in a large pot with the veggies and bring to a boil. Lower heat and simmer for 20 minutes. Place into sterilized, hot jars. Seal. (Please look at the safe canning guidelines. Click here for link.) Process 15 minutes for quarts, 10 minutes for pints. Let cool thoroughly. 

Wednesday, August 18, 2021

Shakshuka

 If you're ever stuck as to what to fix for dinner and you don't have a lot of time, Shakshuka is right up your alley. This meal comes together in under 30 minutes and you can adapt to use whatever garden vegetables you have on hand. 


I started out by sauteing diced bell peppers (one of our local stores had an amazing deal on bell peppers, so I picked up all colors of them, diced them all up, put a quart up in the freezer and have half a quart to use up in recipes. I also used half of a peeled zucchini and a quarter of a Walla Walla sweet onion. There's also a couple of cloves of minced garlic in there, too. 


Now, why am I mincing everything up so finely and peeling the zucchini? My husband has had all of his teeth removed and will be getting dentures. He's been dealing with the after effects of having radiation treatments for throat cancer over 10 years ago. There's a spot in his throat that the muscle just doesn't work and food hangs up there and it chokes him. Pair that issue with the fact that radiation treatment wiped his teeth out and he didn't have any molars to properly chew food, well...you get the idea. Cooking has been a challenge, to say the least.
I only have a few more months and he'll have dentures and he'll be able to eat proper food again. First on his list, I'm sure, is a steak and a salad.


Here is my spice blend that I used. It contains paprika, chili powder, ground cumin, basil, oregano and some palm sugar (just a pinch). 


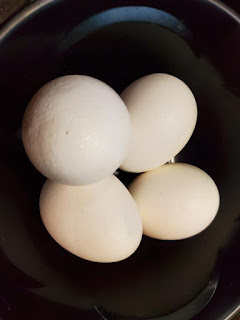
I use 2 eggs per person for this recipe. If you only want one per person, that's fine. Eggs are completely subjective in this recipe.


Now, with the tomatoes, you can either use a can of tomatoes or you can use fresh. It's all up to you. I didn't have enough ripe tomatoes, so I opted to use a can of diced. If you used canned tomatoes, you can use pureed, diced, whole, stewed, it doesn't matter. Since I used canned tomatoes, I used a pinch of palm sugar to take the tin taste out of them. This is when all the vegetables get cooked down into a homogeneous pan full of deliciousness.
This is a different type of cooking for me. Usually, I like my vegetables to retain some of their texture. For Bob, they have to be cooked super soft. Last night, I didn't quite achieve that with the bell peppers. Next time, I will.
Let this stew, over low heat, until the vegetables are done to your taste preference.


Once the tomatoes and vegetables have cooked to your liking, make a well with a spatula and crack an egg into. Continue to cook, over low heat, covered, until the whites are set and the yolks are still runny. 


You can serve this dish over rice or with toasted bread. I actually put it over mashed potatoes so that Bob could get some substance in him.

Shakshuka
2 servings


1 tablespoon avocado oil
1/2 small zucchini, diced (you can peel, if desired)
1/4 small Walla Walla sweet onion
1/3 cup finely diced bell pepper (whatever colors you like, or a mix of colors)
2 cloves minced garlic
1 teaspoon paprika
1/2 teaspoon ground cumin
1/2 teaspoon dried basil leaves
1/2 teaspoon dried oregano leaves
1/4 teaspoon chili powder
2 teaspoons dried parsley
1/2 teaspoon palm sugar
1 (15-ounce) can diced tomatoes
4 eggs
Salt and pepper, to taste

In large skillet, over low heat, cook all vegetables, except for canned tomatoes, and garlic until very soft, about 15-20 minutes.
Meanwhile, in a small bowl, mix all spices together, with palm sugar, and set aside. Once the veg is cooked, sprinkle the spice mixture over evenly and cook for about 1 minute. Add tomatoes. Let heat until simmering. Add salt and pepper, to taste.
Make a well in the sauce, with a spatula, and crack an egg into it. Repeat for all eggs. Cover, and continue to simmer over very low heat until the egg whites are set but the yolk is still runny. Serve over rice or mashed potatoes or serve with toasted bread.


Sunday, July 18, 2021

Thai-Inspired Red Coconut Curry Shrimp over Coconut Rice

 My husband gets started on some extensive dental work on Tuesday. He will be having all of his top teeth pulled. Granted, he's already lost most of them, but the rest will be going. When he had radiation treatment for throat cancer, over a decade ago, his teeth were trashed. He needs to get dentures. So, for several months, after getting his bottom teeth pulled out, which will be a few weeks after he gets the top ones done, he will not have any teeth at all to chew with. He needs to get dentures because he can't eat many foods. He has scar tissue in his throat and there is a dead muscle in there. It doesn't work. Anyhow, if food isn't chewed up really well, it hangs up on that spot and it chokes him and, sometimes, I've had to really whack him on the back to get it up. It's scary to go through and eating certain things for dinner gives me anxiety because I do not like to see that happen. Let's not even go there with Bob actually going through it. Yes, it's happened a few times at restaurants, too. He's learned to not order his favorite, which is steak. He knows that he can't eat anything like Chinese sweet and sour pork or chicken. He has trouble with spinach and greens. Tortillas and a gas station corn dog have made him choke. The poor guy!

Anyhow, that's the back story on how this recipe came about.
We both love Asian food. I think we could dine on Asian flavors for weeks on end and never tire of it. While Bob tends to favor Korean, I lean bit more toward Thai cuisine. We both like coconut curry, if it's not too spicy. So, I came up with a complete main dish that only uses 1 can of coconut milk, 1/2 a pound of shrimp, uses up a few summer squash, doesn't result in a gallon of leftovers and it's not spicy because, if it is, Bob can't eat it.
This is a huge win in my book. I do not have room in my fridge for leftovers and I'm not a huge fan of zucchini, or summer squash. I like winter squash just fine, but zucchini...yeah...not so much. I find summer squash to be just tolerable. Now, if you take that summer squash and put in a red coconut curry squash, that's going to pique my interest.


Here's how I did it. First, wash and chop all your ingredients. Make sure everything is prepped. Once you start, you do not have time to put everything on hold to chop up the next thing. Chop the veggies. Peel the shrimp. Thank me later. You're welcome. 


Veggies prepped beforehand.


Start the rice after you prep the veggies and shrimp. You'll have 20 minutes to cook the curry. If you don't have a rice cooker (I am not endorsing this brand. It's just a cheapie that I picked up on Amazon for under $20 and it does the trick because the burners, on my RV stove, burn too hot to cook rice on them), just use a saucepan with a tight-fitting lid. Either way, rice cooker or pan, it's going to take 20 minutes.

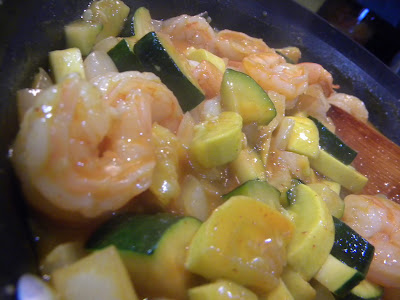
Saute the veggies in a hot skillet in a tablespoon of avocado oil until zucchini start to get a bit of color and the onion is softer, but not mush. 

Now's the time that you'll want to have already prepped those shrimp. I do pull the shells completely off. I don't leave the tail sections on. I actually don't really like it when the tail section of the shell is left on. It's annoying to me. 
You've already used 1/2 of a can of coconut milk in the rice, so this is when you use the other half of the can. First, you add red curry paste, fish sauce and some brown sugar. This would also be where you could add in a spice element, if you want, like however many Thai birds-eye chili peppers it takes for you to light yourself on fire, if you're into that! I skip them because of Bob. If it was just for me, I'd add 2 or 3 in. You could also just use crushed red pepper flakes or you could use a jalapeno pepper. There's many options out there. Pick the one that's right for you.
Did that sound like a commercial or what?


Once all the curry paste, coconut milk, and what have you meld together into a  homogeneous pool of yum, toss in the shrimp and keep stirring them around until they curl up and turn pink. This is very important. Do not overcook the shrimp. Overcooked shrimp is absolutely nasty and not even worth eating. Once they turn opaque, take the pan off the heat.
By this time, your rice should be done.
Also, by this time, your entire RV will be filled with a very lovely coconut scent...with the faintest hint of fish sauce.
Make sure to run an exhaust fan.
Whatever you do, DO NOT sniff the contents of a bottle of fish sauce.
I promise that it tastes nothing like it smells.


This was delicious. There were no leftovers at all because (mic drop) I actually created a recipe for TWO PEOPLE!
Thai-Inspired Red Coconut Curry Shrimp over Coconut Basmati Rice (yes, I know that they usually eat Jasmine rice, but I have basmati...deal with it). Delicious!


Serves 2


Coconut Basmati Rice

7 ounces (half a can) of coconut milk
1/2 cup + 2 tablespoons water
1/2 teaspoon brown sugar
1/4 teaspoon sea salt
3/4 cup basmati rice

If you're cooking in a rice cooker, add all the ingredients and cook for 20 minutes. If you're cooking in a saucepan, bring all ingredients, except the rice, up to a boil. Add rice, stir. Lower heat to as low as your stove will go. Pop a tight-fitting lid onto the pan. Cook for 20 minutes. Turn off the heat. Let stand for 5-10 minutes before opening lid to fluff the rice.


Thai-Inspired Red Coconut Curry Shrimp

1/2 pound large shrimp, peeled and cleaned.
1 tablespoon avocado oil
1/2 can coconut milk
1/2 of a medium-sized Walla Walla sweet onion, chopped (use 1/4 of the onion if it's a big one, like I had)
1 small zucchini, chopped
1 small yellow summer squash, chopped
1-2 tablespoons red curry paste
1/2 tablespoon fish sauce
1 tablespoon brown sugar
and
Make a cornstarch slurry using 1 tablespoon cornstarch mixed with 1 tablespoon water. You may or may not need this.

Prep all vegetables and shrimp in advance.
Heat skillet or wok over high heat. Add onions and cook, stirring constantly, for about 2 minutes before adding in all the squash (zukes and yellow squash) all at once. Continue to cook and stir for about 4-5 more minutes or until squash starts to get a bit golden in color and onion is soft but not mushy.
Add in red curry paste, cook for about 30 seconds, add fish sauce, brown sugar and coconut milk. Stir to combine curry paste into coconut milk. Once it's thoroughly blended in, add shrimp and cook, stirring, for another 3-4 minutes. If your sauce is too loose, bind it by slowly drizzling in the cornstarch slurry until it's the right consistency. I like mine a bit on the thinner side so that it will permeate the rice. If you want a thicker sauce, use the entire amount and it should tighten up enough to sit on top of the rice. It's a matter of preference.


Saturday, July 17, 2021

Mid-July Garden Update

The garden tour starts with showing you all the cranberry beans. I don't know what it is, but peas and beans grow really well for me. I don't really do anything special, I just have a knack for them.

Here's another view of the cranberry beans. These are a bush variety and I'm going them out for seed for next year so that I might actually get a crop. If there's enough, I'll let them dry.

These are that rare Arapaho Fish Hill variety. They have climbed the fence and are starting to bloom. I have no idea of how long of a season they need.

Blooming Prairie bush beans. I grew these out last year and these are from the seed that I saved. These will be a beautiful purple color.

Purple Podded Pole beans.

Flood Pole beans on top, Borlotto di Vigevano beans in the middle and I have a sole Contender variety on the very bottom with a nasturtium to keep it company.

Nasturtiums and some heat zapped hanging baskets.

Nasturtium

Jerusalem artichokes

Ladybird Purple Spot nasturtium

My lavender bloomed and it smells wonderful!

My tomato jungle! I have 6 varieties here.


Some odds and ends. There's some Bronze Beauty calendula, ramps, garlic and some iris bulbs in a pot back there.

My peppers were heat zapped.

Black Beauty eggplant bloom

Black Beauty eggplant

My little corn patch is adorable! Yes, it's going to produce, too!

It's getting silks and starting to form little ears of corn. I may double my corn growing next year if it does ok this year.

I planted Pink Surprise calendula around both apple trees. They needed to be friends.

I'm curious as to what these flowers are going to look like. There's some Snow Princess calendula on the top tier, Bright Lights cosmos in the middle and Love in a Mist on the bottom.

My Concord grape vines are rebounding from their severe pruning that we gave them before they were moved over here.

My pot of Purple Empress nasturtiums that aren't all purple and they look horrible...but they are producing seeds and that's what I want them to do.

Oregon Spring heirloom tomato

Lots of Oregon Spring. I'm actually impressed with little determinate variety's production.

Blue Beauty heirloom tomato. The production is nowhere near that of the Oregon Spring or that of the Marglobe or Gold Nugget varieties that I have in another area.

Paul Robeson. This hasn't throw out a fruit yet.

We're just harvesting everything and stretching it out for about 4 more weeks. That's when I'll plant my fall garden. Right now, it's time for those abundant spring crops to slide over and make way for the beans, tomatoes and squash.

We'll be harvesting the rest of the potatoes within 2 weeks.

Spaghetti squash

Oh, yes, I'm going to have spaghetti squash!

Maxibel beans. These are a French variety and a staple in my summer garden.

The collards are starting to fall victim to the heat. I'm leaving them for the bugs to eat.

I can still harvest off of them, too.

Tanya's Pink Pod beans. I need to save seeds for these this year as I planted all I had.

I love growing Bachelor Buttons in my garden. I put them in there for the pollinators.

The cuke is starting to flower out. I haven't had it set fruit yet.

Cucamelon plant. There are some tiny blooms and fruit on there. I'll have to see what all the to-do is about with these.

A garden friend. I have plants placed around my little area that encourage these guys to come and hang out.

Here is is, mid-July. These Spring Blush pea vines are still blooming!! I'm saving these all for seed for next year as the seed is nowhere to be found because all the good seed sites are sold out.


Spring Blush Pea

Oregon Sugar Pod bloom

Oregon Sugar Pod. I'm not saving seed for these as this variety is very common in the stores around here.