Tuesday, June 15, 2021

Mid-June Garden Update

Yes. It's that time. It's the middle of June and it's time for a garden walk through. 


Here is the start of my garden. From right to left, I have Cranberry beans, a very rare Arapaho Fish Hill bean, three varieties of peas (Oregon Sugar Pod, Sugar Snap and Spring Blush), Egyptian Walking onions and common garden chives.


I have all 3 pea varieties producing. Usually, I would plant peas on March 1st, but I was a month late this year due to moving. 


These are the Oregon Sugar Pod variety. I really like these because the peas grow in clusters. These vines don't get overly tall, either. They are easy to contain.


These are Egyptian Walking onions that are in the midst of walking. They are a wonderful vegetable for the lazy gardener. You plant them once, they require minimal care and they are self-propagating. See all those little flowers? Each one of those will turn into a cluster of bulblets. The entire onion is edible and they grow in all types of soil, even gravel. If you decide to grow these, you'll want them in their own place as they can take over a garden when they "walk". 


From top to bottom: Blooming Prairie bush beans, Dragon Tongue bush beans and my solo Orchid Flame nasturtium.
The Blooming Prairie are from seeds that I saved from growing them last year. They are supposed to be a bush variety, but they acted more like a half-runner because they did climb. No matter. That's why I put them up closest to the fence so that they can grab on and climb if they are so inclined. These are a gorgeous shade of purple when they grow out.
The Dragon Tongue is a staple in my garden. We just like them.
I have a few seeds of Contender that someone sent to me that I think I will stick in the bottom with the nasturtium.

These are volunteer Jerusalem artichokes. I planted 2 tubers last year and did not harvest them. They came back this year. I will harvest this year and relocate them elsewhere.

This is the start of my little area. I like to make these. I like gardens that have these little "areas" around each corner. I have the Jerusalem artichokes, some Tall Trailing nasturtiums and rosemary with a little bird house tucked in.


From top to bottom: Flood pole beans, Borlotto di Vigevano Nano bush beans and some Ladybird Cream Purple Spot Nasturtiums. Next to the wooden planter, in the 2 square white ones, I have a mystery variety of yard long beans and some Purple Podded pole beans. 


Here are 6 different varieties of tomatoes. I have heirlooms and hybrids. I'm doing a pruning and trellising experiment this year. I'd like to thank my Facebook friend, Jean, for gifting me the biggest plant on the end. We have no idea of what it is, exactly, but I'm anxious to find out! It's the tallest tomato out there on the trellis.

I bought this pair of Pink Lemonade blueberry bushes in 2013. They have always been in this tub. After this year, I'll be removing them and putting them in a bottomless raised bed. The key to successful blueberries is to not let them berry out for the first 2-3 years so that they can concentrate on establishing a root system. I've taken these guys as far as I can as far as being in a container. I have nothing bigger for them! 


We planted a couple apple trees this year. We have a Fuji and a Golden Delicious. The white sleeve is to keep the Wascly Wabbit, that we see hopping around, from eating them. 


This is my wooden A-frame planter. I have a Snow Princess calendula, Bright Lights cosmos and Love in a Mist planted on one side and I have two tiers of Giant Italian parsley on the other side.


My 7 year old Concord grape vines got a major haircut last winter, in anticipation of moving. The roots had pushed out through the bottoms of the pots and had went into the ground. We had to pop the roots on them. What I mean is that since the roots had grown out through the bottom of the pot and had 3 years to establish where I had them, in front of my old fifth wheel, we had to break the tap root so that we could move the pots.
Bob cut the bottoms out of the pots and we sunk them into the ground with a wire trellis. This will be their permanent home from now on. We won't get a harvest this year but they should come back with a vengeance next year because breaking off the roots rejuvenates them.

Black Beauty eggplant that I got from the Master Gardener's plant sale this year. I can't say as I'm impressed with their ability to grow starter plants. I don't think I'll utilize them again. I haven't been having very good luck with their starter plants at all.


I used to have quite the container garden of roses but I'm down to just 2 now. 

I used an organic soil blend that I bought from a local company mixed with worm castings and mushroom compost. The stalks on these tomatoes, on the trellis, are amazingly healthy despite how much rain we've been getting.

This is the starter plant that I got from my friend, Jean. It's the biggest one on the trellis! It's also a mystery plant. We don't know what type it is yet. I'll call it a Wait-N-See. I take all the lower leaves off my tomatoes, about 18-24 inches up the plants. They don't need them and they are less susceptible to getting any splash up fungal infections from the soil. Almost all of my tomatoes, whether determinate or indeterminate, are grown in 5 gallon fabric grow bags. 

The narrow walkway between the dog pen and our outdoor lounge room. 


This is what I call the "Back Garden". It's where 99% of my containers go. I have my blueberries (well, they are actually pink), roses, peppers, eggplants, corn and the apple trees back there. I had Bob stake out some landscape fabric and that is my designated area for putting pots down.

This is my sole determinate variety of tomato. This is an Oregon Spring. It's an heirloom. A determinate tomato variety only grows so tall and it sets all of its fruit at once and it all ripens at, pretty much, the same time.


This is the "zucchini" plant that the neighbor gave to me. I'm not entirely sure that it's a zucchini because she had already given me a 4-pack of squash plants that she thought were yellow zucchini but, in all actuality, they were spaghetti squash. I tried to tell her that the tags are in those starter plants for a reason. I don't think she's very observant, but, hey, I don't mind taking and planting mistakes in my garden! This zuke isn't doing very well. I have it in a 5-gallon grow bag and I think that all this rain we've been getting is trying to do it in. Meh. If it lives, it lives. If it doesn't, I'm not heartbroken.


This is another heirloom tomato that I got from the Master Gardener's plant sale. This is a Blue Beauty. It's a variety that I've been wanting to grow out, but I don't think that the master gardeners hardened off their plants very well. It will produce, but it's not going to win any beauty contests, for sure.


This is the 3rd tomato that I bought from the Master Gardeners. This is an heirloom variety called a Paul Robeson. The only size that they had available was a "1 gallon" size and it cost me $8. Yes, I realize it is flowering. It was doing that on the day I brought it home. I pulled them all off and put it in a big pot (10 gallon, I think) and I planted it as deep as I could. It's another one of those plants that will produce but it will not win any beauty contests. This was not hardened off very well at all. 


For perspective, that is the zucchini plant next to my Yukon Gold potatoes. Yukons throw out pink-purple blooms. The flowers indicate that the plant is producing potatoes. 


These were supposed to be Watermelon radishes but I got them in late and they bolted on me. I'm just letting them go to seed because that bed is so incredibly full of onions that I can't really replant anything else in there. I'll leave the flowers for the pollinators and collect the seed for next year.


Here's where I seeded in some sweet basil.


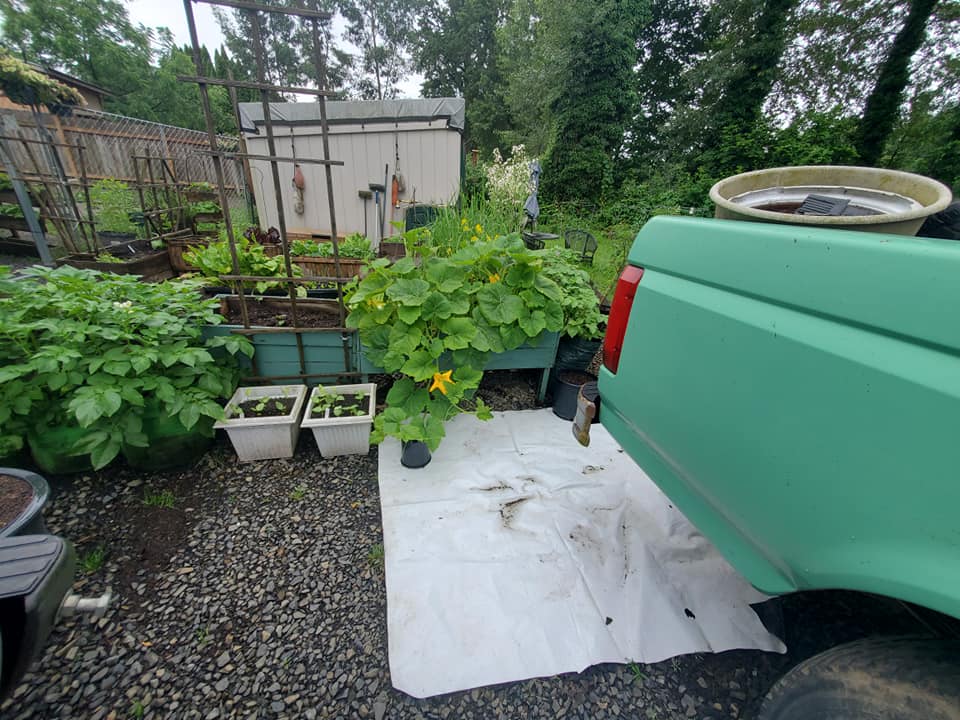
This is looking at the row of beds that I have Spaghetti squash planted in. That was the neighbor mistake that I was happy to take on. in the square white pots, I have red and green yard long beans planted. Next to the beans, I have some red Kennebec and some Red-Gold potatoes growing. They, too, are starting to flower. The trellis is for the yard long beans.


Another look at that area. The plastic is so the squash stay off the gravel. I hand pollinated the two female flowers that I had on the squash.


Turning toward our trailer, there are two big pots. I seeded them both in with Chioggia beets. In one, I companion planted coneflowers (ecinachea) and in the other I companion planted dill. These are experiments. I don't know how well they will grow with each other.


Behind the Kennebec potatoes, I have beds for rhubarb (which isn't growing this year due to transplanting), 2 types of bush beans: Maxibel and Tanya's Pink Pod, and in the brown bed, I have collard greens with Peppermint Stick zinnias in the front. 


This is fenugreek. I seeded it in after I had planted some Parisienne Market carrots that I thought were duds. I added a little mushroom compost and planted the fenugreek and the carrots decided to join the program, too. I'll just let them grow together.


This is a variety of lettuce that I grow just because of the name. It's called Drunk Woman Frizzy Head. It's fantastic!


I'm not really one for kale, but it is nutritionally dense, so that is why I decided to plant it. This is Lacinato aka Dinosaur kale. It's really tender as a baby green in a salad blend. 


These are a French heirloom variety of carrot called Longue Rouge Sang. I ordered the seeds from Baker Creek. This is a stunner in the looks department. 

In this half of the bed, I seeded in Pink Plume celery. You can order seeds for it from Fruition Seeds. It is, indeed, pink. It's not like regular celery and it has a very strong flavor. 


This is just plain ol' cilantro. I don't really grow cilantro for the leaves, I grow more for the roots. Here, in the United States, we don't really utilize cilantro to its full potential as the entire plant is edible. In Asian cuisine, particularly Thai and Vietnamese, they tend to use the root of the cilantro plant. That's why I grow it. 

This variety of lettuce is called Sword. I did a trade for the seeds 2 years ago but only got around to planting this year. I really like this lettuce. It has a wonderful taste, the shape is unique in a salad blend and it's pretty to look at. I'd grow this again...and I will because I still have a ton of seeds leftover. 


This is bok choy (or pac choi, depending on which country you're in). This is an amazing early spring vegetable to grow. I use it in stir fries, soups, salad blends. It's super nutritious and will always make an appearance in my garden. I harvest this (and all my salad greens) using the cut and come again method.

Moving on to the next bed, I have Red Romaine lettuce, mixed bachelor buttons and Strawberry spinach planted.


I saw a starter plant for a Cucamelon and I couldn't resist. I don't have a clue of how well it will grow here, but we'll see.


Here is my bed of Tanya's Pink Pod and Maxibel bush beans. These are coming along awesome!

Thanks for taking the garden tour with me. I'll post another update the first part of July!


Monday, June 14, 2021

Brizola Sto Fourno


 Every delicious dinner starts with an idea. It's been raining pretty much the entire weekend here. The upside is that I don't need to water my garden, the downside is that I had to put a towel over my head and shoulders to go out and pick our salad greens yesterday. It was a warm rain, so I'm okay with that. I love growing my own lettuces. You just cannot begin to find these types or varieties in a store and you'd be hard pressed (or, at least, I would be) to even find them at a farmers market. I have Red Romaine, Sword, Buttercrunch and Drunk Woman Frizzy Head. 

Last night's meal started out with some potatoes that I needed to use up.
I had Bob run into the little market up in Castle Rock on Friday as I needed some yogurt and milk. He came home with some really nice looking bone-in pork chops. In a couple of days, he'll be getting all of his top teeth pulled out (when he had radiation treatment for cancer, 11 years ago, it wiped out his teeth), so whatever Bob wants to eat, I'll fix it for him. I get to decide the style, however.
I found a recipe that I talked to my sister, Ginger, about and we both agreed that it sounded unusual to us...but it was just too unusual to not make it. I did cut the recipe in half. Click here to view the recipe.

As with any recipe that is really delicious, it starts out with some potatoes. 

Here is the "unusual" part. You soak parchment paper in water. Yep. You read that right. You soak 2 large pieces of parchment paper in water. Get it wet. Swish it around. Let it soak for a few minutes. 

After you get done playing around with the parchment paper in the water, wring it out. Next, drape it over your baking sheet and cut up your potatoes. You could use Yukon Gold or a nice red skinned variety. It doesn't really matter.


The potatoes get seasoned with some chopped garlic, extra virgin olive oil, salt and pepper. Then you drizzle over some lemon juice (this is a Greek dish, after all!) and...


some white wine. I used a nice 2016 sauvignon blanc from right here in Washington state. We do tend to have some pretty spectacular wines produced from this state. 


After you add the wine, you cover the potatoes with the second piece of soaked parchment paper and seal it up. Then it goes into a 350-degree oven for around 40 minutes. Check it after 30 minutes because it really depends on your oven.

While the potatoes are in their lemony wine sauna, put some grill marks on your pork chops via a grill pan. Do not cook through. Remove from the pan and set aside.


After 30-45 minutes, pull the potatoes out of the oven, open the parchment sauna and...


stick the chops in on top of the potatoes. Reseal it and stick it back in for another 15 minutes or so. 

It doesn't get much better for a Sunday family dinner.


Saturday, June 12, 2021

Our New Fifth Wheel, Pros & Cons

 In March, we moved out of our 1991 29-foot Alpenlite fifth wheel and  into our much newer 30-foot 2014 Forest River Wildcat Maxx when the neighbors, kiddy-corner across the street, offered it to us. 

We had lived in that Alpenlite for over 8 years. It served us well. We gave it to a guy who lives in here. He was grateful to get it and we didn't have to worry about cleaning it out and all that. I wasn't really into it, to be honest.


 Our neighbors were moving into a house and they offered to sell us this whole set-up...for a song! As chance would have it, we happened to have the cash saved up and were able to simply buy it outright. Yes, we paid cash for it and yes, it was a lot of cash. LOL!


This is a 2014 Forest River Wildcat Maxx. It's 30 feet long, with 3 slides. It also has an outdoor shower and an outdoor kitchen. 

We bought the trailer, the canopy over it and an outbuilding that has electric and cable run out to it. 


Here is the outbuilding. Everything is still a work in progress. We have bought a patio set to put in there so that there is furniture and we do have a TV for out there, too.
I digress...
This is about the pros and cons of our new fifth wheel.


It is a very nice looking trailer. It serves our needs quite well. There are a few things that I just do not like about this trailer, however. 

I do not like how high the cabinets in the kitchen/galley are. I cannot reach them, even with that nifty step stool that is in the kitchen. I also don't really dig having a cat box in my kitchen, but it was the only logical place to put it and, honestly, having it there is a good reminder to keep that sucker scooped out.
I also do not like my kitchen sink. In the old trailer, I had stainless full-sized double sinks. In here, I have white sinks that I have promptly stained up because I wash so many dishes and one is bigger than the other. Why would anyone, intentionally, want such a small frigging sink?? I don't get it. We did replace the faucet as the other  one was stuck on spray and I didn't like that. It was an easy fix, especially when you have a MacGuyver for a husband, like I do. He's one of those guys with skills. You know, skills. He can fix any-frigging-thing that there is, especially if it's electrical.
I took a hit in the kitchen department with this trailer. The kitchen has much more floor space, but it sucks as far as how high the counters and cabinets are and the size and position of the sink. Also, the stove only has 3 burners.The lighting is horrendous and, with the canopy over the trailer, it is dark in the kitchen. We are going to install a florescent fixture in the kitchen somewhere. There is absolutely no silverware or utensil drawers unless you put them in one of the 4 drawers under the pantry. There is no counter space and the counter space that is there to work with is awkward and not reachable. Those are the cons of the kitchen. This fifth wheel was not designed for those of us that are 5'5" or less.


However, the pros are that I can plop my cutting board over the corner of the sink to prep for cooking and watch TV. I have a microwave. The stove cooks hot. The oven temp is spot on. It's easy to tell when you need to wipe everything down. I can't let that many dirty dishes accumulate because the kitchen isn't tucked into the back of the trailer, the kitchen is right smack in the middle of the trailer.

In summary, I liked the kitchen in my old Alpenlite much better. I had more room. I had more usable counter space. I had great lighting. I had a ton of windows. I had 4 burners. I could reach all my cabinets. I had full-sized double stainless sinks.

Now, on to the rest of this new trailer. 


Moving on to the bathroom. The bathroom in the Forest River is hands-down the better bathroom, without a doubt. The shower is bigger. It has built in shelves for shower supplies. There's a skylight in the shower. There's a big medicine cabinet. There's a linen closet. There's under the sink storage. There's adequate towel racks and there's a storage shelf. There's a sliding, pass-thru door to the bedroom. The only thing that the Alpenlite beat the Forest River in is the size of the bathroom sink. The Alpenlite has a bigger bathroom sink. Other than that, there's really no comparison. The Forest River has an opulent bathroom compared to the Alpenlite.


I have to mention this pantry. This is part of one of our slide-outs. This pantry houses all of my at-the-ready pantry items and our dishes. In the top two drawers are silverware and utensils and in the other top drawer are those big and bulky utensils under kitchen towels. In the bottom drawers, I have one for excess spices and the other holds my other bulk items, like flours, seeds, etc. Both of those bottom drawers are crammed full. I'm working on using up the spice drawer so that I can move the bulky utensils into it.


We did not have a dining nook in the Alpenlite. The dining area was in the kitchen. This a separate dining nook. We have a ton of under the bench storage for canned goods and kitchen appliances. This is located in the same slide-out that the pantry is.


This is another of those areas that there is absolutely no comparing, the living room area. Hands down, the Forest River has the better living room area. There's so much more room in there and there's another slide out that we have a small Ikea sofa sleeper put into. It's more like an animal lounge that they deign to let Bob sit on every now and then.
It's almost not fair to compare these areas that have the slide outs because the Alpenlite didn't have any slides at all. 


Just this feature, on its own, would win the contest as to which trailer has the better living room. We use this every single morning. 


The bedroom area is another one of those rooms that can't even be fairly compared. The Forest River bedroom area is the better area. There are, however, some pros and cons. First, the pros are that I can stand upright in the bedroom in the Forest River. I could not do that in the Alpenlite. The built-in dresser drawers in the Alpenlite were much bigger than the Forest River's are. The closet was also bigger. In the Alpenlite, we had under-the-bed storage (as we do in the Forest River, as well) but, there were 2 nice sized drawers under the bed in the Alpenlite. We don't have those in the Forest River. So, as far as clothes storage, we had more space in the Alpenlite. The entire wardrobe on the Forest River is the third slide out. In the Alpenlite, we had 2 drawers on either side of the bed, in the built-in nightstands. In the Forest River, we have cabinets under the nightstands. I'm not sure which I like better. Sure, I can shove more stuff into a cabinet, but I'm not into squirreling a bunch of crap away in a cubbyhole. I'm trying to whittle down to only the stuff that I actually use. I don't need a ton of superfluous crap.
Also, in the Alpenlite, under the steps going up to the fifth wheel, the whole floor lifted up and it was storage space. We called it the basement. We also had a big linen drawer under the clothes closet.
So, just because I can stand upright, I'm going to say that that I prefer the Forest River bedroom to the Alpenlite.

Now, onto the outside areas of each trailer.


 This, right here, is what clinched the deal for me. This is our outdoor kitchen. There's a cabinet, a small counter, a pull-out 2-burner propane stove, a utensil drawer and a small refrigerator. We love the extra outdoor storage. We had to replace the rams on the hatch. This is a great little area.
We also have climate controlled, carpeted under the trailer storage in the front and we do have an outdoor shower.

In the Alpenlite, we just had 4 outside storage cubbyholes.


So, in conclusion, the Forest River Wildcat Maxx is the superior fifth wheel for full-time living as far as amenities go. It has that great electric fireplace heater. It has a built in radio/CD/DVD player. It has central air/heating. It's super propane efficient. It has quite a few windows and there's a skylight in bathroom and in the living room. It also has outside quick-connect hook-ups for a propane grill (not counting the stove in the outdoor kitchen). It's much easier to empty your black water tank in the Forest River and there's a back flush on the tank so that you can clean it out much easier. The hot water tank is both electric and propane and, if you're doing dishes or showering, you can flip the toggle switch to propane assist and it will keep some semblance of warm water. The pass-thru bathroom is just freaking cool, no matter how you want to look at it. There's also an actual bedroom door so that you can close it off and have some peace and quiet...well, at least until the cats and dogs figure out that you have locked them out. The slide-outs make a world of difference as far as space. The Grrr-ells (that's what we call our 3 female Australian kelpies) can stretch out and not be on top of each other. Of course, the cats have ripped up the screen door and the piece of lath next to it, but we did expect that and have bought a replacement piece of lath that matches. As far as the door, we'll probably replace the bottom with a piece of plexi-glass and really mess with the cats.
The Alpenlite had a much better kitchen.
So, the Alpenlite served us well, but we're onto better things now with the Forest River.


Friday, June 11, 2021

Asian Chili Oil...As Promised

I promised everyone on Facebook that if they would help me get this blog up to 20 followers, I'd cut loose with my chili garlic oil recipe. This recipe is something that I keep in my fridge at all times because I drizzle it on everything. I do not buy chili oil from the store. Making my own tastes so much better. I start out by toasting some sesame seeds over low heat until they start to turn brown and get a nutty flavor. As a matter of fact, since it's raining out, today would be a good day to simply toast up a batch of sesame seeds to just have on hand.
Here are the aromatics that will get infused into the oil. It is not simply chilis, oil and garlic. Nope. There's much more flavor in there. Let's talk about some of these aromatics.
First, there are Szechuan peppercorns. What these do is give your tongue a numbing sensation. I use them quite often when cooking spicy Asian dishes and they are something that I always have on hand.
I also use green cardamom pods. These are optional, as are the whole cloves. You don't have to add them, but since I have them on hand, why not? The rest of the must have aromatics are star anise, a stick of cinnamon and a couple of bay leaves.
This was the ingredient that I was waiting on. I order it from Amazon because there are no supermarkets, in my area, that carry gochugaru. Gochugaru is Korean red pepper flakes. These are delicious.
You use any neutral flavored oil. I chose to use avocado oil.
The aromatics, along with a couple of scallions and a couple cloves of smashed garlic get infused into the oil, over super low heat for as long as it takes for the onion and garlic to get quite brown. It can take up to an hour.
After that, you pour the oil through a strainer to strain out all of the aromatics leaving you with just the flavored oil.
Pour the oil very slowly over the gochugaru in a heat proof container (I use a stainless bowl) as it will bubble up. After that, stir in the toasted sesame seeds and sea salt to taste.
Store in the refrigerator. This oil will last up to 6 months when properly stored.

Asian Chili Oil

1-1/2 cups avocado oil (or any other neutral flavored oil, like canola or vegetable)
4 whole star anise
1 cinnamon stick
2 bay leaves
1 tablespoon Szechuan peppercorns
5 green cardamom pods
1/2 teaspoon whole cloves
2 scallions, white parts only
2 cloves garlic, smashed
3/4 cup gochugaru
1 tablespoon toasted sesame seeds
1/2 teaspoon French grey salt (or whatever salt you like)

Combine the first 9 ingredients in a heavy bottomed saucepan and cook, over very low heat, until the garlic and scallions are quite brown and fragrant.
In the meantime, add the gochugaru into a heat proof bowl. Measure out the salt and sesame seeds into a small bowl and set aside.
Once the oil has been fully infused and is very fragrant, pour S-L-O-W-L-Y through a fine mesh strainer over the top of the gochugaru. This will bubble up very vigorously. Once you've poured all of the oil in, add in the sesame seeds and salt. Stir well (I use a chopstick for this). Cool to room temperature, pour into a container with a tight-fitting lid and store in the refrigerator for up to 6 months. Use whenever you need a kick of chili flavor.
 

Thursday, June 10, 2021

Maangchi's Galbi Grilled Ribs With Green Onion Salad Side Dish

 I'm hoping that Maangchi will like another one of my posts on Twitter. It makes my entire day when she does. I can't help it, though. She has so many great recipes that just appeal to me.


Last night, I made 2 of Maangchi's recipes. Bob was not able to partake of kimchi or the green onion salad, so I eyeballed the onion salad to make enough for just one person. It was spicy and delicious and it completely hit the spot with me. I plan on using the superfluous kimchi in another Maangchi recipe. I haven't made kimchi yet because I have very limited refrigerator space and, living in a fifth wheel, I just really don't want either my indoor, or my outdoor kitchens smelling like it. So, I simply had Bob pick up a jar that was alive with all the good stuff that kimchi has in it. I plan on using the rest of the kimchi to make another Maangchi recipe and then I think I'll move onto a different type of cuisine for a while.
I'm just trying to use stuff up. 


I grow green onions out in my raised beds. I did quite the thinning on them. They are huge! I planted over 300 and I've been able to share with a few of the neighbors, which is cool. I've even shared onions with Ginger (you'll see her commenting every now and then on here...she's my younger sister). Anyhow, you can't have a green onion salad side dish without green onions.
Both recipes have scallions in them.


The Galbi Ribs start out with short ribs. You do not want the flanken style for this, you want the meatiest short ribs you can find. Unfortunately, these were the best that the store had and, at $7.99 per pound, I feel we paid for bones. You can't win them all. Soak these in cold water and pat dry. 


Next, you cut the meat out, so that it makes as long of a strip as you possibly can. These get sprinkled with sesame oil, sugar, salt, scallion and chopped garlic.
Here's where I make a confession. I forgot to add the garlic until just before I cooked these. It happens. You'll want to pat/smack all these ingredients into the meat and then roll them back up...

like this.
Put them in the fridge for a couple of hours to marinate.
In the meantime, make the Green Onion Salad side dish. 


This salad usually gets put into the lettuce/perilla leaf bundles along with the Galbi. Click here and scroll down for the recipe.
I could eat this salad every single day. I'm not thinking that my stomach will thank me, but my taste buds sure would!


These ribs are best cooked over charcoal, but I used my grill pan. You unroll them and start searing. 

Let them get some crispy edges. Just keep turning them back and forth. 


Then use scissors to cut up into bite-sized pieces. Let those cook until there's no longer any pink on the outside of the meat. After this is when you, traditionally, set out a plate of lettuce or perilla (or both) leaves, some ssamjang, slices of raw garlic and some Green Onion Salad.
Bob is going to be starting to get some extensive dental work done, so, hopefully, when that is all over, he will be able to eat one of these bundles. 


So, this is how we enjoyed these delicious Maangchi recipes last night.

Thanks, Maangchi!